Why Proper Brush Grip Changes Everything in Chinese Calligraphy
Pick up a Chinese calligraphy brush the way you'd hold a pencil, and you'll feel it immediately: something is off. The bristles wobble, the ink pools unevenly, and your strokes look timid instead of alive. That disconnect between intention and result almost always traces back to one thing — your grip.
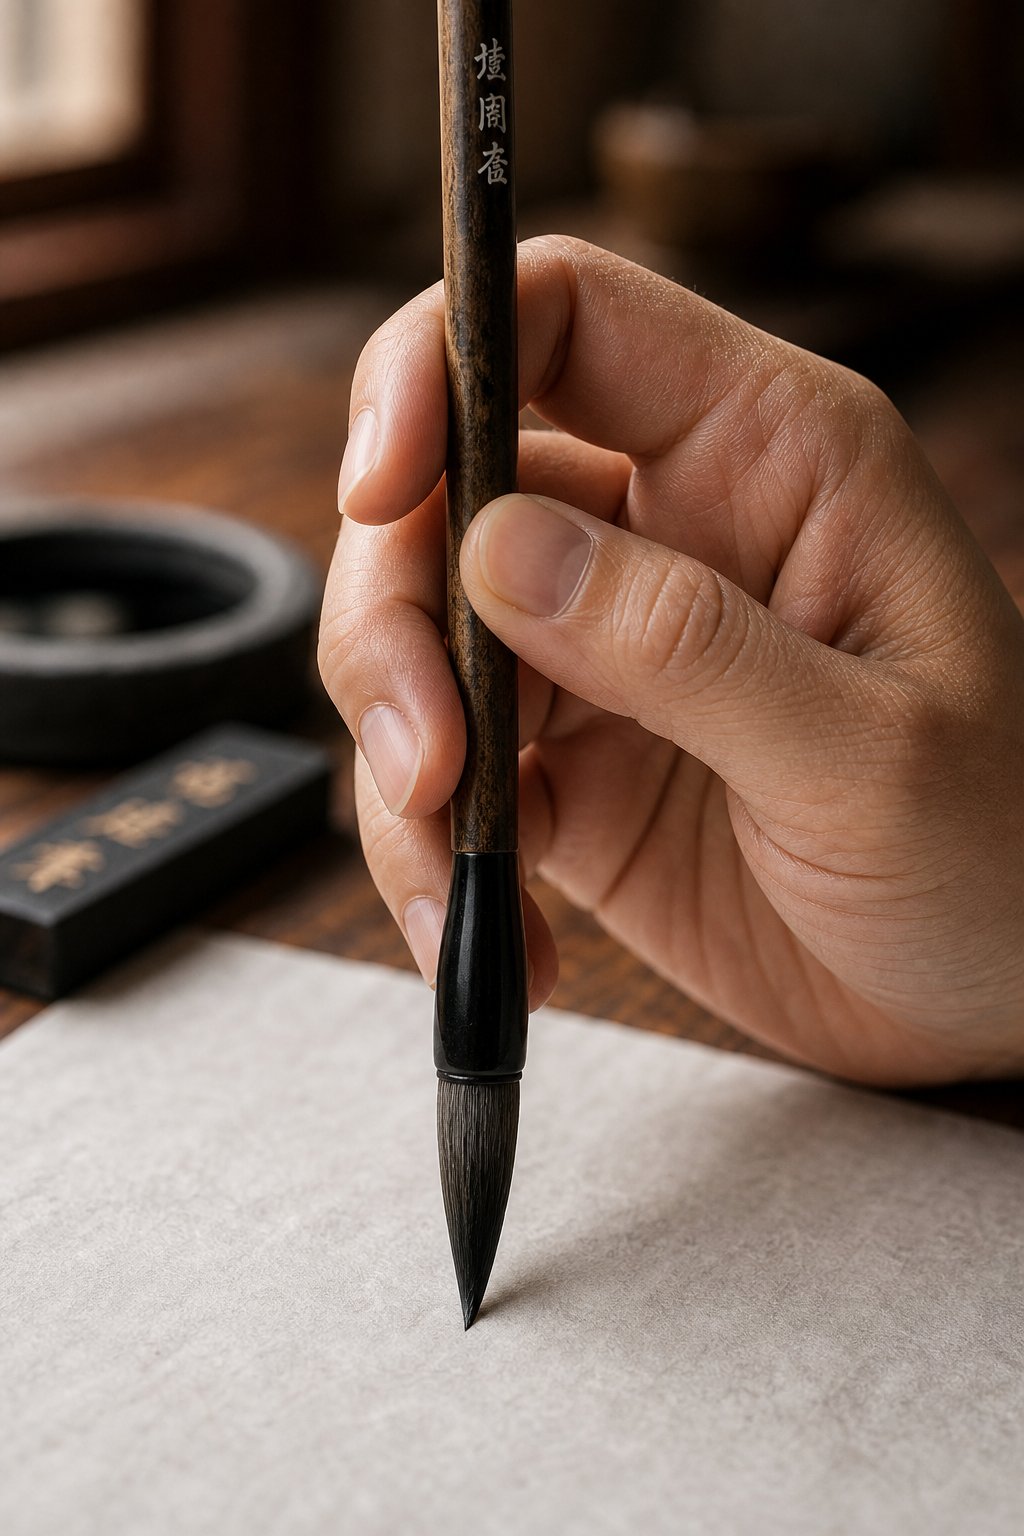
In Chinese calligraphy, the brush is not merely a writing tool. It's an extension of your body's energy, channeling force from your shoulder through your fingertips and into the paper. Every dot, hook, and sweeping horizontal stroke begins at the point where skin meets bamboo. Learn how to hold a Chinese calligraphy brush correctly, and you unlock control over line weight, rhythm, and expression. Get it wrong, and no amount of practice will compensate.
Why Brush Grip Is the Foundation of Every Stroke
Calligraphers throughout Chinese history treated brush grip as the single most important technical skill to master before anything else. The reasoning is straightforward: your fingers determine the angle of the brush tip against the paper, the pressure you can apply, and the range of motion available for each stroke. A flawed grip limits all three.
Think of it like a pianist's hand position. You can memorize a sonata perfectly, but if your wrists are locked and your fingers collapse at the knuckles, the music sounds flat. The same principle applies here. Chinese calligraphy brush grip basics aren't a formality you rush through — they're the physical foundation that makes expressive writing possible.
The Classical Principle Behind Proper Holding Technique
For over a thousand years, one four-character phrase has guided every serious practitioner's approach to the brush:
指實掌虛 (zhi shi zhang xu) — "Fingers solid, palm empty." Keep your fingers firm on the shaft while leaving the center of your palm hollow and relaxed, as if you could hold a small egg inside without crushing it.
This principle, attributed to Tang Taizong (Emperor Taizong of the Tang Dynasty), captures the essential paradox of proper brush holding technique for beginners and masters alike. The emperor himself explained it simply: solid fingers distribute muscular force evenly, while an empty palm allows the brush to move freely in any direction.
In physical terms, "fingers solid" means each fingertip presses the brush shaft with deliberate, balanced pressure — not a death grip, but a stable hold that won't slip under movement. "Palm empty" means your fingers don't curl inward or clench. The space inside your hand stays open, giving your wrist and fingertips room to pivot, rotate, and guide the brush through complex strokes without tension locking you in place.
This balance between firmness and openness is what separates a functional grip from a masterful one. And it's exactly what the steps ahead will help you build — starting with the tools you'll need and moving through finger placement, body alignment, and script-specific adaptations that turn a beginner's hold into an artist's instrument.
Step 1 - Prepare Your Brush and Workspace
Your grip can only be as good as the brush in your hand. A shaft that's too thin forces your fingers to pinch. One that's too thick prevents your fingertips from wrapping properly. Before you practice any finger placement, you need the right tools on your desk — and a basic understanding of how brush anatomy affects holding technique.
Essential Supplies for Your First Practice Session
Chinese calligraphy has relied on the same core toolkit for centuries. Known collectively as the four treasures of the study for practice, these items form the foundation of every session:
- Brush (bi): Your primary tool. For grip practice, choose a medium-sized brush with a bamboo shaft roughly 0.8 to 1.2 cm in diameter — thick enough to rest comfortably against your fingers without cramping.
- Ink (mo): Bottled ink works fine for beginners. It lets you focus on grip mechanics instead of grinding technique.
- Paper (zhi): Inexpensive practice paper (maobianzhi) absorbs ink quickly and shows stroke quality clearly. Save Xuan paper for later.
- Inkstone (yan): Even with bottled ink, a small inkstone or dish gives you a place to control how much ink loads onto the brush.
Add a felt mat beneath your paper to absorb bleed-through, and you're set.
Understanding Brush Anatomy and How It Affects Grip
When selecting the best calligraphy brush for beginners, you'll want to pay attention to three physical properties that directly influence how the brush sits in your hand.
First, shaft diameter. The calligraphy brush shaft size for grip matters more than most beginners realize. A shaft between 0.8 and 1.2 cm lets your thumb and index finger oppose each other naturally, creating the stable "fingers solid" contact described in the previous section. Thinner shafts suit small-character work but demand more finger precision. Thicker shafts feel unwieldy until your hand strengthens.
Second, hair length and type. The tuft — everything from the tip ("hairs of life") down through the belly and loins — determines how the brush responds to pressure. Stiff hair (wolf or weasel) snaps back quickly, requiring a firmer grip. Soft hair (goat) bends easily, rewarding a lighter, more relaxed hold. A mixed-hair brush offers a middle ground that forgives grip inconsistencies while you're learning.
Third, tip flexibility. A brush with strong "loins" (the base of the tuft near the ferrule) bounces back to center after each stroke. This resilience means your fingers don't need to manually straighten the tip — reducing the temptation to over-grip.
For your first practice brush, look for a medium mixed-hair brush with a bamboo handle around 1 cm in diameter and a tuft length of 3 to 4 cm. This combination gives you enough feedback to feel how grip pressure translates into stroke weight, without fighting the tool itself. With the right brush in hand, you're ready to place each finger exactly where it belongs.
Step 2 - Master the Five-Finger Grip Method
You have the right brush, the right workspace, and a clear mental image of "fingers solid, palm empty." The question now is practical: where does each finger actually go? The answer lies in the five-finger brush grip method step by step — a system so refined that it has remained the standard for nearly a thousand years.
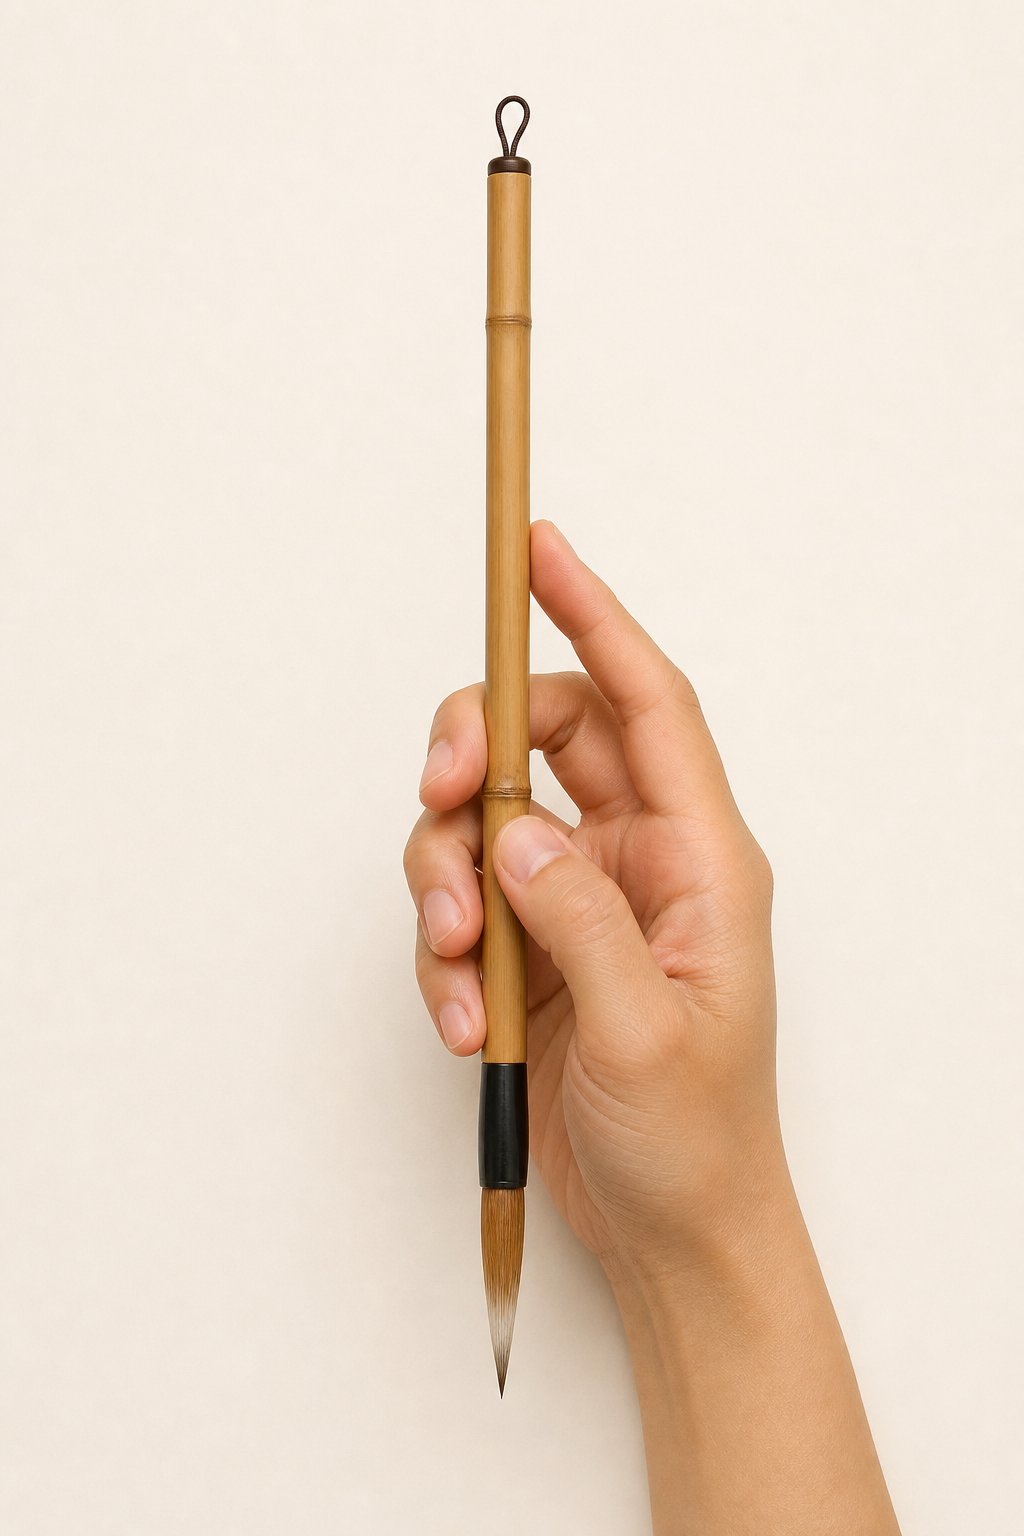
Known in Chinese as 五指執筆法 (wu zhi zhi bi fa), this technique assigns a specific role to every finger. None are passive. Each one presses, hooks, or supports the shaft from a different angle, creating a ring of balanced forces that holds the brush stable without locking your hand into rigidity.
Placing Each Finger in the Five-Finger Method
Imagine the brush shaft as a vertical pole surrounded by your fingers on three sides. The five positions work together like spokes pressing inward and outward against a hub. Here's the proper finger placement on calligraphy brush, broken down one digit at a time:
- Thumb (Press / 擫): The inner pad of your thumb's first segment presses against the left-rear side of the shaft, pushing force from inside outward. Your thumb sits in a slightly sideways position — not pointing straight up. Think of it as the anchor that prevents the brush from rolling away from your body.
- Index finger (Restrain / 押): The first segment of your index finger presses against the right-front side of the shaft, pushing inward. It directly opposes the thumb, and together these two fingers form the primary pinch that secures the brush. The fingertip, not the knuckle, makes contact.
- Middle finger (Hook / 鉤): Bend your middle finger into a gentle hook shape. The fleshy pad of its first segment curls around the outer side of the shaft, pulling inward. It reinforces the index finger's grip and adds a third point of contact, turning an unstable two-point pinch into a solid triangular hold.
- Ring finger (Resist / 格): Here's where most beginners struggle. Your ring finger presses against the inner side of the shaft using the area where nail meets flesh. It pushes outward — directly opposing the inward pull of the index and middle fingers. This counterforce is what keeps the brush centered rather than tilting toward your palm.
- Pinky (Support / 抵): The little finger tucks firmly against the ring finger without touching the brush shaft directly. Its job is to reinforce the ring finger's outward push, adding stability to that crucial counterbalance. Think of it as a buttress, not a contact point.
A key detail: keep minimal gaps between your second, third, fourth, and fifth fingers — ideally less than half a centimeter. When fingers spread too far apart, the forces they generate become isolated rather than coordinated, and your grip loses its unified strength.
Achieving the Hollow Palm Position
When all five fingers are positioned correctly, something specific happens inside your hand. Your palm forms a natural hollow — round, open, and relaxed. The Chinese calligraphy hollow palm technique isn't something you force. It's the automatic result of proper finger placement.
Here's the test: with the brush in position, you should be able to fit a small egg inside your palm without your fingers curling inward to block the space. The gap between your thumb and index finger — called the "tiger's mouth" (虎口) — opens into a rounded shape resembling a stirrup or an oval. If that space collapses into a narrow slit, your thumb is pressing too flat or your index finger is reaching too far forward.
The purpose of this hollow isn't aesthetic. When your palm stays open, the muscles and tendons in your hand remain relaxed. Tension can't build up in your forearm. Your wrist stays supple. And the brush tip responds to the smallest adjustments from your fingertips rather than being locked into a single angle by a clenched fist.
Three physical checkpoints confirm you've achieved the correct position:
- The back of your hand arches naturally upward, forming a gentle dome
- Your palm faces roughly vertical — not tilted flat toward the table
- The brush handle stands perpendicular (or very close) to the paper surface
Vertical palm, hollow center, upright brush. These three elements work as a unit. If one collapses, the others follow.
Historical Origins of the Standard Grip
The wu zhi zhi bi fa finger positions didn't emerge from a single inventor. But their codification into a formal system traces back to the Tang dynasty, when calligraphy reached its peak as both art and imperial practice. Tang Taizong (reigned 626-649) was famously passionate about calligraphy — he collected over two thousand works by Wang Xizhi and established the Imperial Academy of Calligraphy as a court institution. His personal advocacy of the five-finger method gave it imperial authority that persisted for centuries.
The Tang dynasty calligraphy grip method was later articulated by Lu Xisheng, who formalized the five characters — Press, Restrain, Hook, Resist, Support — into the teaching framework still used today. The renowned modern calligrapher Shen Yinmo endorsed this lineage directly, stating that the five-character method "was passed down from the Two Wangs and elucidated by Lu Xisheng of the Tang dynasty," calling it the only brush holding method he acknowledged as fully correct.
Before the Song dynasty, calligraphers commonly used a three-finger method — partly because they wrote at low desks while kneeling, which changed the angle of approach. As chairs and tall tables became widespread during the Song, the five-finger grip emerged as the dominant technique because it offered superior control in the new upright writing posture. Even Su Shi, the great Song calligrapher who personally preferred three fingers, acknowledged that the key principle remained constant: keep the palm empty and the hold flexible.
What this history tells you as a practitioner is simple. The five-finger method isn't arbitrary tradition. It's a biomechanically sound solution refined across dynasties, tested by masters writing everything from imperial edicts to personal letters. Master it as your default, and you'll have the stable foundation from which every variation and adaptation becomes possible.
Step 3 - Explore Alternative Grip Techniques
The five-finger method is your foundation — but it's not the only legitimate way to hold a brush. Accomplished calligraphers throughout Chinese history have used alternative Chinese brush grip methods depending on the script style, character size, and physical posture they were working with. These aren't shortcuts or lazy habits. They're deliberate, refined techniques with their own strengths.
The ancient proverb 定法非法 ("a fixed method is not a method") captures this philosophy perfectly. Once you understand the principles behind grip, you can adapt your hold to serve the work rather than forcing every situation into a single template.
The Three-Finger Grip for Small Script Work
The three finger calligraphy brush grip technique uses only the thumb, index finger, and middle finger to hold the shaft. Your ring finger and pinky rest lightly beneath, curled away from the brush without making direct contact. The hold feels similar to gripping a pen — compact, precise, and close to the tip.
Why would anyone use fewer fingers? The reasoning is biomechanical. Your fingertips contain far more sensitive nerve endings than your knuckles or finger pads. By concentrating contact into three fingertips, you gain heightened tactile feedback from the brush. Every micro-movement of the tip registers more clearly in your hand, which translates into finer control over small strokes.
Historically, this method dominated during the pre-Qin dynasty periods when calligraphers wrote small seal script (Zhuan Shu) at low desks. Characters were tiny, and the three-finger hold gave writers the precision they needed. Su Dongpo, one of the Song dynasty's greatest calligraphers, famously preferred this approach throughout his career.
One important caveat: the three-finger method works best when paired with the suspended arm technique (hanging elbow), where no part of your arm rests on the desk. The reduced finger contact means your arm and shoulder provide the stability that the missing two fingers would otherwise supply. For this reason, it's generally not recommended for beginners still building foundational control.
Single Hook vs Double Hook Finger Positioning
Beyond finger count, there's another variable that changes your grip character: how your fingers curve around the shaft. This is where the distinction between single hook and double hook brush holding comes in.
In the single hook method, only your index finger hooks around the front of the shaft. Your middle finger sits behind the brush alongside the ring finger, pushing outward. This creates a more relaxed, open hand position with less inward pressure on the shaft. The brush moves more freely, making it well-suited for cursive and semi-cursive work where speed and fluidity matter more than rigid control.
In the double hook method, both your index and middle fingers curl around the front of the shaft, pulling inward together. This doubles the hooking force and creates a tighter, more secure hold. You'll feel more resistance when the brush tries to shift angle — which is exactly what you want for structured scripts like regular (kaishu) or clerical (lishu) where each stroke demands precise start and stop points.
The Qing dynasty calligrapher Bao Shichen documented both methods in his influential book Yi Zhou Shuang Ji, illustrating them as equally valid approaches passed down from his teacher Deng Shiru. His work gave later calligraphers like Wu Rangzhi and Zhao Zhiqian the confidence to adopt whichever hook method served their artistic goals.
Choosing the Right Grip for Your Practice Level
So which calligraphy grip method for small characters — and which for large expressive work? The answer depends on what you're writing and where you are in your development.
| Grip Method | Fingers on Shaft | Best Use Case | Difficulty Level |
|---|---|---|---|
| Five-Finger (wu zhi fa) | 5 | All-purpose; large and medium characters; structured scripts | Beginner-friendly |
| Three-Finger (san zhi fa) | 3 | Small characters; seal script; work requiring heightened sensitivity | Advanced (requires suspended arm) |
| Double Hook | 5 (two hooking) | Regular and clerical script; precise stroke control | Intermediate |
| Single Hook | 5 (one hooking) | Running and cursive script; relaxed, fluid movement | Intermediate |
A practical approach: master the five-finger double hook method first. It gives you the most stability and the widest range of application. As your control improves and you begin exploring cursive styles or smaller character sizes, experiment with single hook positioning or the three-finger technique. You'll feel the difference immediately — less structure, more sensitivity, greater freedom of movement.
These alternatives aren't signs of rebellion against tradition. They're part of the tradition itself, refined by centuries of practitioners who understood that different writing tasks demand different physical solutions. The grip you choose shapes the energy that reaches the brush tip — and that energy changes depending on whether you're carving precise kaishu or letting caoshu flow across the page.
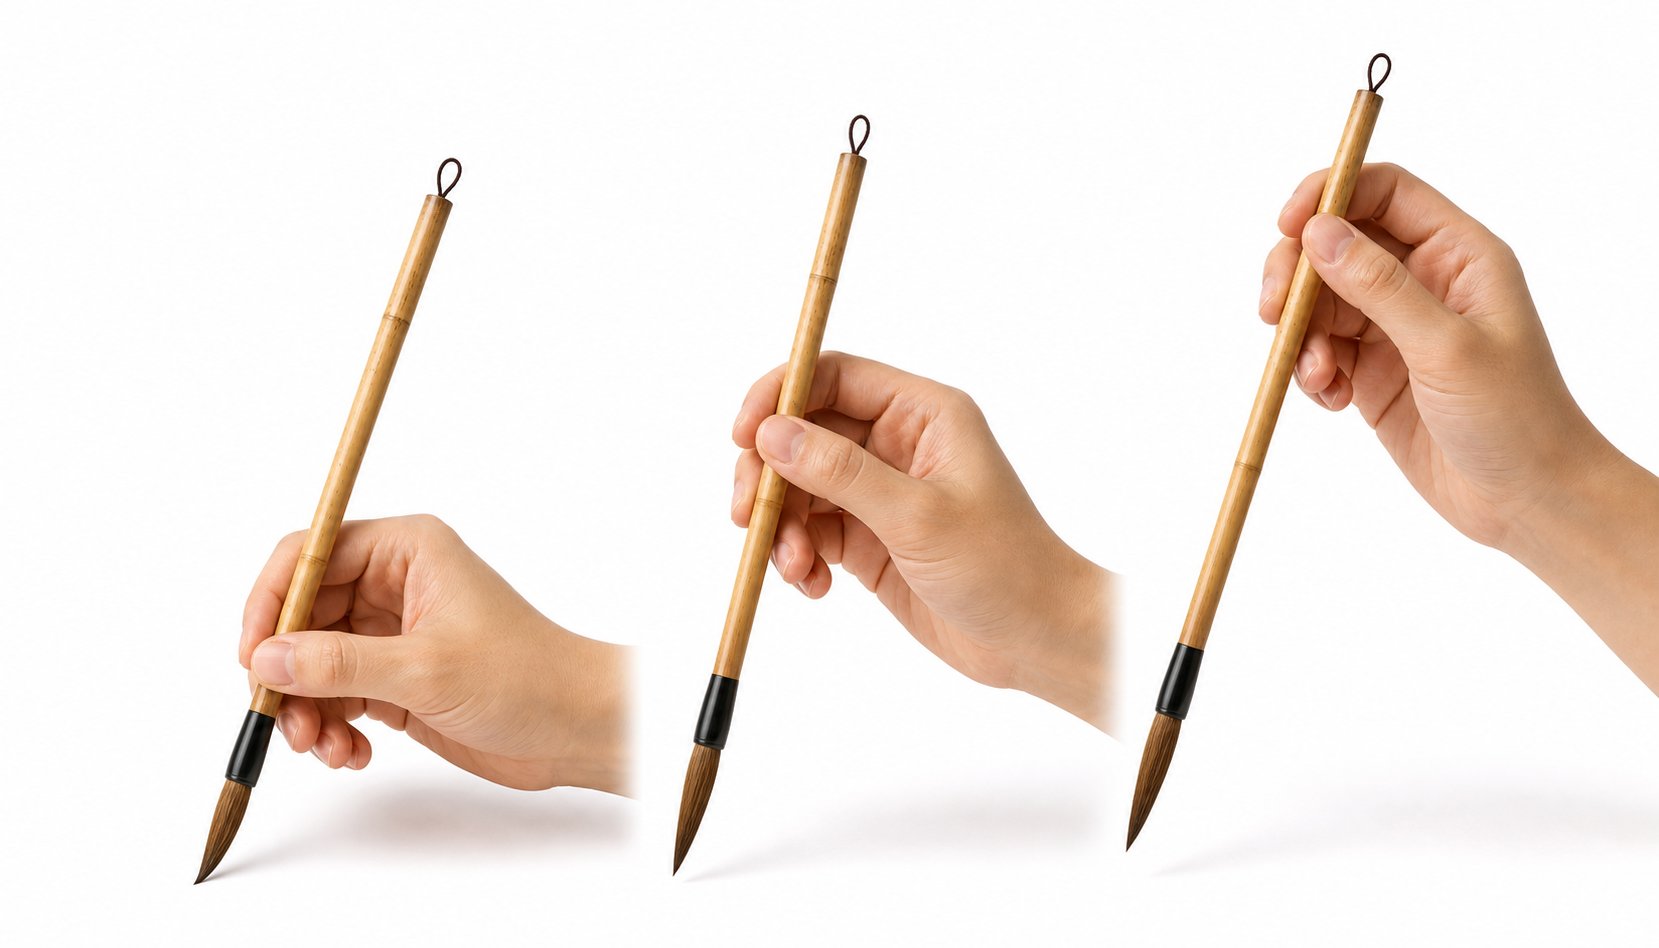
Step 4 - Position Your Fingers at the Right Height on the Shaft
You know which fingers go where. You understand the difference between single hook and double hook. But here's a question most beginners never think to ask: how far up or down the shaft should your fingers sit? This single variable — grip height — changes the entire feel of your brush, the weight of your strokes, and the size of characters you can comfortably produce.
Imagine holding a long stick and trying to draw a tiny circle on the ground. Grip it near the bottom, and you have pinpoint accuracy. Grip it near the top, and the tip swings in wide arcs you can barely control. The same physics apply to your calligraphy brush. Where to grip calligraphy brush on shaft isn't a matter of personal preference alone — it's a mechanical decision that should match the work you're doing.
Low Grip for Precision and Control
When you hold the brush in the lower third of the shaft — roughly 2 to 4 centimeters above where the bamboo meets the ferrule — you shorten the lever between your fingers and the brush tip. A shorter lever means less amplification of hand movement. Every tiny tremor in your fingers produces only a tiny deviation at the tip, giving you maximum control over stroke placement and thickness.
This is the ideal brush grip position for regular script (kaishu), where each stroke demands crisp beginnings, controlled turns, and deliberate endings. The classical principle states it directly: the smaller the script, the lower you hold the brush; the less cursive the script, the lower the brush is held.
A low grip also keeps the brush naturally upright. Because your hand sits close to the paper, the shaft has less room to tilt sideways. You'll notice that characters under 5 cm benefit enormously from this position — the strokes stay tight, the proportions stay consistent, and your hand fatigue stays low because you're not fighting leverage against you.
One trade-off: a low grip restricts your range of motion. Your fingers can only push the brush so far in any direction before they run out of travel. For small, structured characters, that limitation is actually an advantage — it prevents you from overshooting. For larger work, it becomes a cage.
High Grip for Expression and Large Characters
Raise your fingers to the upper third of the shaft, and everything changes. The lever lengthens. A small wrist rotation now produces a sweeping arc at the brush tip. Your strokes gain amplitude, speed, and a sense of momentum that's impossible to achieve with a low hold.
This high vs low brush grip position difference explains why calligraphers writing large-format pieces or expressive cursive (caoshu) always grip near the top. They need the brush to cover ground quickly, to swing through dramatic curves, and to vary stroke weight from hairline thin to boldly thick within a single character. A high grip delivers all of that by turning small body movements into large brush movements.
The physics are straightforward. Think of your fingers as the fulcrum of a lever. The longer the distance between fulcrum and tip, the greater the mechanical advantage for producing wide, sweeping strokes. But that same amplification magnifies every wobble and hesitation in your hand. A high grip demands confidence — and it demands that your wrist and elbow provide the stability your fingers no longer can.
Calligraphy grip height for different character sizes follows a logical pattern. Characters between 5 and 10 cm work well with a mid-shaft grip. Characters larger than 10 cm — the kind you'd write on hanging scrolls or exhibition pieces — call for the upper third or even the very top of the handle. At that height, your entire arm becomes the writing instrument, with your fingers serving mainly as a pivot point rather than a steering mechanism.
Finding Your Natural Grip Position
A practical guideline to start with:
- Lower third of the shaft: Characters under 5 cm. Regular script, clerical script, small seal script. Maximum precision, minimal sweep.
- Middle third of the shaft: Characters between 5 and 10 cm. Running script, medium-sized regular script. A balance of control and fluidity.
- Upper third of the shaft: Characters over 10 cm. Cursive script, large-format exhibition work. Maximum expression, minimal restriction.
These aren't rigid rules. They're starting points. As you practice, you'll develop an intuitive sense of where your fingers want to sit for a given task. Some calligraphers naturally grip slightly higher than average because they prefer arm-driven movement. Others stay low because they value fingertip precision above all else.
Here's a simple experiment: write the same character three times — once with a low grip, once at mid-shaft, and once near the top. You'll feel the stroke weight shift each time. Low grip produces thin, controlled lines. High grip produces thicker, more dynamic strokes with greater variation. The ink behaves differently because the pressure dynamics change with lever length.
The key insight is that grip height isn't static. It's a dial you adjust depending on what you're writing. A single practice session might involve dropping your fingers low for a line of small kaishu, then sliding them up for a large running-script couplet. This adaptability — moving fluidly between positions — is what separates mechanical repetition from responsive, intentional brushwork.
Grip height determines how much of your body participates in each stroke. Hold low, and your fingertips do most of the work. Hold high, and the movement cascades upward through your wrist, elbow, and shoulder. That kinetic chain — from fingertip to shoulder blade — is exactly what shapes the quality of your line.
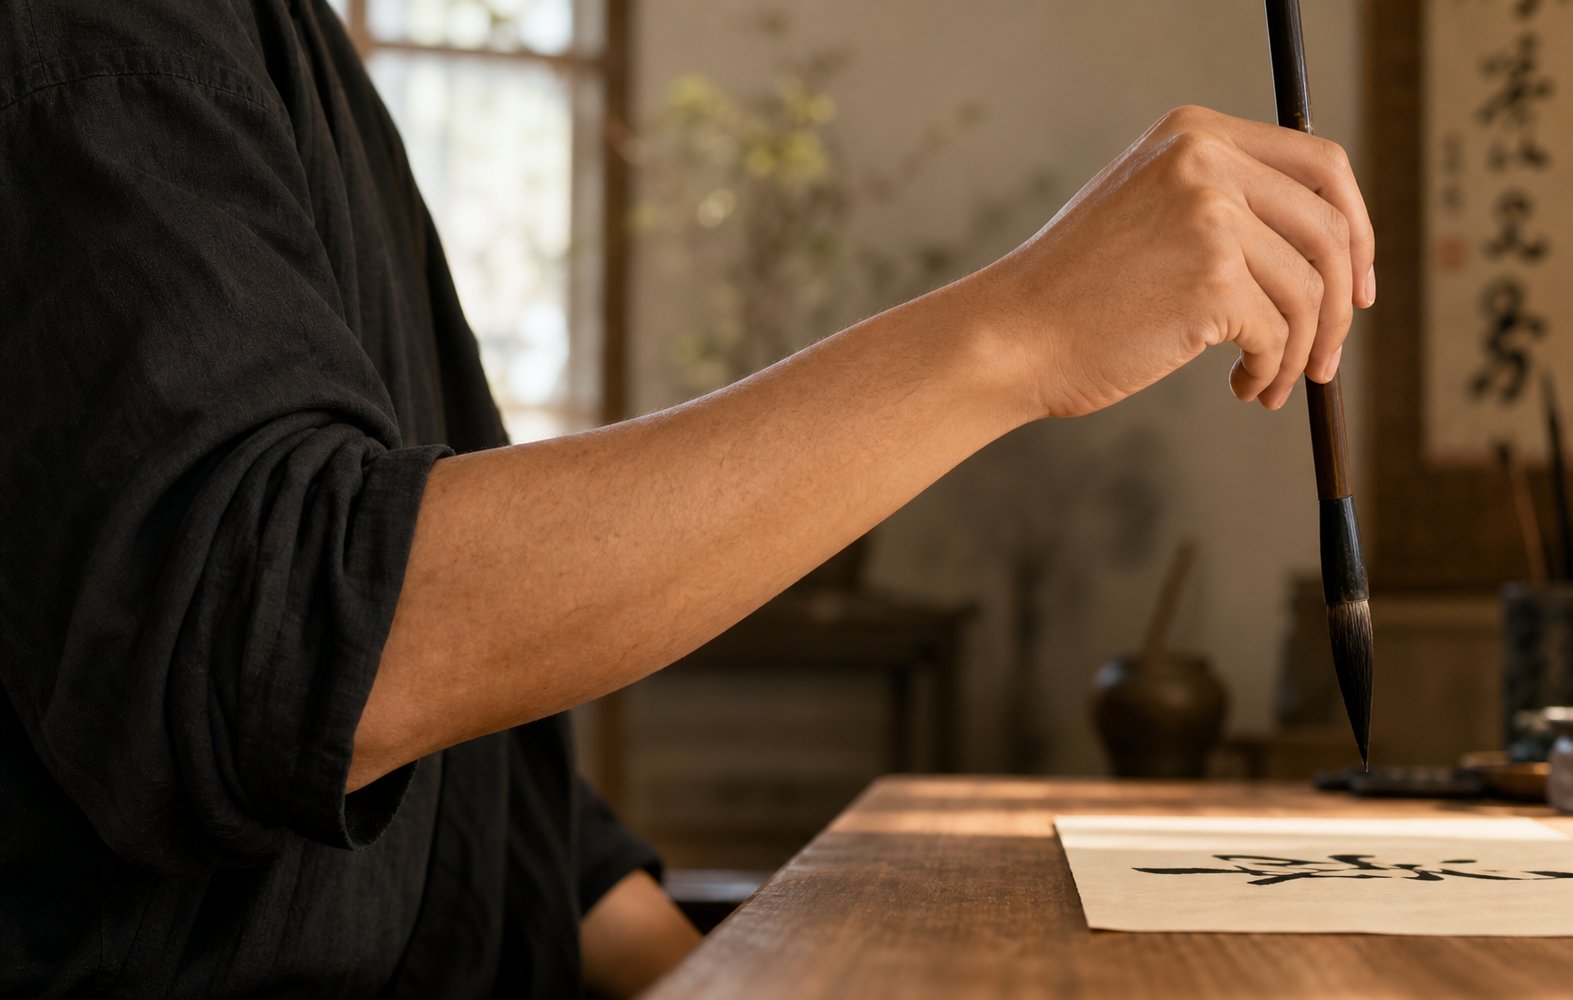
Step 5 - Align Your Wrist, Elbow, and Shoulder for Fluid Strokes
Your fingers grip the brush, but they don't write alone. Every stroke travels through a chain of joints — wrist, elbow, shoulder — before it reaches the paper. Tension or misalignment at any link in that chain telegraphs directly to the brush tip. A locked wrist produces stiff, mechanical lines. A raised shoulder injects tremor into curves. Even shallow breathing tightens the forearm muscles that control fine movement.
Calligraphy posture from wrist to shoulder isn't a secondary concern you address after mastering grip. It's part of the grip itself — the invisible architecture that determines whether your fingers can do their job freely or fight against a rigid arm.
Wrist Position and the Suspended Wrist Technique
Your wrist connects finger precision to arm power. Its position relative to the table surface defines how much freedom your brush has to move.
Three wrist positions exist in Chinese calligraphy, each suited to different character sizes and script styles:
Resting wrist (zhenwàn 枕腕) means placing your left hand flat on the table and resting your writing wrist on top of it for support. This method, which first appeared during the Song Dynasty, provides maximum stability. Your hand barely shakes, making it ideal for small characters around 0.5 to 1 inch. The trade-off is limited range — your brush can only travel as far as your fingers can stretch without lifting the wrist.
The suspended wrist technique in Chinese calligraphy (xuánwàn 悬腕) lifts your wrist off the table while your elbow may still rest on the surface. Imagine your wrist floating on a cushion of air — supported by muscle tone rather than a physical surface. This position, believed to have originated during the Tang Dynasty, opens up medium-range movement. You can write characters between 1 and 4 inches comfortably because your wrist can pivot, rotate, and glide without friction holding it back.
The physical cue that tells you it's working: your wrist should feel buoyant, not strained. If you notice the tendons on top of your forearm standing out like cables, you're holding your wrist up with tension rather than letting it float with balanced muscle engagement. Relax until the effort feels minimal — just enough to keep the wrist airborne.
Elbow and Shoulder Alignment for Fluid Strokes
Raise the stakes further with the suspended elbow (xuánzhǒu 悬肘). Both wrist and elbow lift completely off the table, freeing your entire arm to move as a single unit. Historical records indicate that calligraphers during the Wei and Jin periods used this method even for writing small characters — a testament to their extraordinary control.
The suspended elbow for large character writing is practically mandatory. When you're producing characters on hanging scrolls or banners, your fingers and wrist simply can't generate enough sweep on their own. The elbow becomes the pivot point, and your shoulder provides the driving force. Japanese calligraphers still maintain this elevated arm position today, partly because their traditional low-table, kneeling posture naturally encourages it.
Here's the critical detail most practitioners miss: your shoulder must stay down. The moment you lift your elbow, your body's instinct is to hike the shoulder up toward your ear. Fight that impulse. Let your shoulder blade settle into your back. Imagine a weight gently pulling your shoulder toward the floor while your elbow floats at table height. This separation — low shoulder, elevated elbow — creates the relaxed power that produces fluid, confident strokes.
A quick kinetic chain checklist, from bottom to top:
- Fingertips: Firm but not white-knuckled. Each finger maintains its assigned pressure without clenching.
- Palm: Hollow and open. The egg-holding space stays intact throughout the stroke.
- Wrist: Buoyant. Floating at the appropriate height for your character size — resting for small script, suspended for medium, fully elevated for large work.
- Elbow: Relaxed at your side for small characters, lifted to table height for medium work, fully suspended for large-format pieces.
- Shoulder: Dropped away from the ear. No hunching, no hiking. The trapezius muscle stays soft.
- Upper back: Broad and open. Shoulder blades settle flat rather than pinching together.
Tension at any checkpoint ripples through the entire chain. A clenched shoulder tightens the bicep, which stiffens the elbow, which locks the wrist, which forces the fingers to overcompensate — and suddenly your strokes look labored no matter how perfect your finger placement is.
Breathing and Relaxation as Part of Brush Control
This is where calligraphy reveals itself as a whole-body practice. Your breathing directly affects muscle tension in your arm. Hold your breath mid-stroke, and your forearm contracts involuntarily. Breathe shallowly from your chest, and your shoulders creep upward without you noticing.
The fix is simple: breathe from your abdomen. Slow, steady breaths that expand your belly rather than lifting your chest. You don't need to turn your practice session into a meditation retreat — just maintain awareness. Before each stroke, exhale gently and let your shoulders settle. You'll feel the difference immediately in how smoothly the brush glides.
A practical way to learn how to relax your arm while holding a calligraphy brush: before you touch ink to paper, hold the brush in writing position and shake your opposite hand loosely at your side. Notice how that shaking releases tension across your whole upper body. Now bring that same looseness into your writing arm. The goal is an arm that feels heavy and relaxed — like a weighted pendulum — rather than light and rigid like a stick held in midair.
Song Dynasty master Mi Fu exemplified this integrated approach. He flexibly switched between resting wrist, suspended wrist, and suspended elbow depending on what the moment demanded, giving him remarkable versatility. His ability to shift seamlessly between positions came from a body that stayed relaxed enough to adapt — never locked into a single posture.
The takeaway: your grip is only as good as the body supporting it. Fingers hold the brush, but the wrist directs it, the elbow powers it, and the shoulder stabilizes everything above. When all these segments work together without fighting each other, your strokes gain a quality that no amount of finger technique alone can produce — a sense of effortless momentum that viewers recognize instantly as skilled brushwork.
Step 6 - Adapt Your Grip for Different Script Styles
A relaxed, aligned body gives you the physical freedom to move in any direction. But move how? That depends entirely on what you're writing. The same brush, held by the same hand, needs a fundamentally different grip configuration for a precise kaishu character than it does for a sweeping caoshu gesture. Adapting grip for different Chinese script styles is what transforms a single technique into a versatile practice.
Think of it this way: a guitarist doesn't hold the pick identically for fingerpicking and power chords. The instrument stays the same, but the hand reshapes itself around the task. Your calligraphy brush works the same way. Each script family demands its own balance of control, speed, and expressive range — and your grip is the mechanism that delivers it.
Grip Adjustments for Regular Script
Kaishu is where structure lives. Every stroke has a defined beginning, a controlled middle, and a deliberate ending. There's no room for ambiguity — each dot and hook must land exactly where you intend it. The brush grip for kaishu regular script reflects this precision.
Hold the brush in the lower third of the shaft, close to the ferrule. Keep your five-finger grip firm — not tense, but decisively engaged. Your wrist can rest on the table or on your opposite hand for characters under an inch, giving you a stable platform that minimizes unwanted movement. The brush stays perfectly vertical, and your fingertips make micro-adjustments to control stroke thickness and direction changes.
The feeling you're after: deliberate and grounded. Each stroke is a conscious decision, not a flowing impulse. Kaishu represents discipline — stable, clear, and highly readable. Your grip should mirror that quality. Firm fingers, low position, minimal wrist travel. You'll notice that this configuration naturally slows you down, which is exactly the point. Speed is not the goal here. Accuracy is.
Loosening Your Hold for Running and Cursive Scripts
Xingshu (running script) sits between control and freedom. Characters connect partially, strokes abbreviate, and the brush lifts less frequently between movements. The running script brush holding technique responds to these demands by loosening what kaishu holds tight.
Raise your grip to the middle third of the shaft. Reduce finger pressure by roughly twenty percent — enough that the brush can rotate slightly within your hold as you transition between strokes. Suspend your wrist so it floats above the table, giving you the lateral range to link characters without repositioning your entire arm. The brush may tilt slightly from vertical as you move faster, and that's acceptable. Xingshu tolerates — even benefits from — a brush angle that shifts dynamically with the writing rhythm.
When you're ready to explore how to hold brush for cursive calligraphy, the changes become more dramatic. Caoshu (cursive script) is pure expression. Characters dissolve into abbreviated gestures. Multiple strokes merge into single sweeping movements. The brush rarely stops.
For caoshu, grip near the top of the shaft. Your fingers hold lightly — just enough to maintain contact without restricting the brush's natural momentum. Both wrist and elbow suspend fully, freeing your entire arm to drive broad, gestural arcs. The brush tilts, rotates, and sometimes nearly leaves the paper between characters. Your shoulder becomes the primary engine of movement, with your fingers serving as a loose pivot rather than a steering mechanism.
The mental shift matters as much as the physical one. In kaishu, you think before each stroke. In xingshu, you think during each stroke. In caoshu, you think between groups of strokes — or not at all, letting trained muscle memory carry the brush forward.
Large-Format Work and Seal Carving Grip Variations
Large-character work — anything over 15 to 20 centimeters — pushes grip adaptation even further. Some calligraphers grip the very end of the shaft with their full fist, abandoning the five-finger method entirely in favor of raw arm power. Others hold the brush overhand, with the shaft passing between index and middle fingers, allowing downward force from the shoulder to drive thick, bold strokes.
Seal carving (zhuanshu) presents its own demands. The ancient seal script features rounded, even-width strokes that require the brush to maintain constant pressure throughout each line. Calligraphers working in this style often grip at mid-shaft with slightly more finger tension than usual, keeping the brush perfectly centered so the tip never favors one side. The wrist stays suspended but moves slowly and steadily — no sudden accelerations, no dramatic pressure shifts.
The table below summarizes how each script style reshapes your grip:
| Script Style | Grip Height | Grip Pressure | Wrist Position | Character Size |
|---|---|---|---|---|
| Kaishu (Regular) | Lower third | Firm | Resting or low suspended | 1-5 cm |
| Xingshu (Running) | Middle third | Moderate | Suspended | 3-10 cm |
| Caoshu (Cursive) | Upper third | Light | Fully suspended (wrist + elbow) | 5-15 cm |
| Zhuanshu (Seal) | Middle third | Moderate-firm | Suspended | 3-8 cm |
| Large-format | Top of shaft or full fist | Variable | Fully suspended (whole arm) | 15 cm+ |
The pattern is clear: as script style moves from structured toward expressive, your grip rises, loosens, and recruits more of the body. This progression — from form to freedom — mirrors the historical evolution of calligraphy itself, which moved from rigid ancient forms toward increasingly fluid personal expression over two thousand years.
Your grip is never a fixed setting. It's a living response to what the brush needs to do in each moment. Master that responsiveness, and you'll move between scripts the way a musician shifts between tempos — naturally, without conscious effort, guided by the demands of the piece itself. Of course, knowing the correct configuration is only half the equation. Recognizing when your grip has drifted into bad habits — and knowing how to fix them — is what keeps your technique honest over months and years of practice.
Step 7 - Diagnose and Correct Common Grip Mistakes
You've learned the finger positions, the body alignment, and the script-specific adaptations. But here's the uncomfortable truth: knowing the correct form doesn't prevent bad habits from creeping in. After ten minutes of focused practice, your thumb drifts. After twenty, your palm collapses. After thirty, you're gripping so hard your forearm burns — and wondering why my calligraphy strokes are shaky when you thought you were doing everything right.
Self-diagnosis is the skill that keeps your technique honest. You need a reliable way to check your grip in real time, catch errors before they become permanent habits, and understand what correct pressure actually feels like in your hand.
The Snatch Test for Grip Firmness
Before dissecting individual finger errors, start with the simplest diagnostic tool available: the calligraphy brush snatch test for pressure. It works like this.
Hold your brush in writing position with all five fingers placed correctly. Ask a practice partner to reach over and try to pull the brush straight out of your hand with a quick tug — not violently, but with a firm, sudden motion.
Two outcomes tell you something is wrong:
- The brush slides out easily: Your grip is too loose. Your fingers aren't engaging the shaft with enough inward pressure to resist external force. You'll likely see ink blobs and inconsistent stroke width in your writing because the brush shifts position mid-stroke.
- Your knuckles turn white and the brush doesn't budge: Your grip is too tight. You're applying far more force than necessary to stabilize the brush, which locks your finger joints and transfers tension up through your wrist and forearm. This is the death grip — and it's the most common calligraphy brush grip mistake among beginners.
The correct result? Your partner feels definite resistance — the brush doesn't slip — but with a strong enough pull, it would come free. Think of it as a firm handshake rather than a vise. The brush stays put during normal writing movements, but your fingers aren't clamped so hard that they can't make micro-adjustments.
No practice partner available? Try this solo version: mid-stroke, consciously relax your fingers by about ten percent. If the brush immediately drops or tilts wildly, you were relying on tension rather than balanced finger positioning to keep it stable. A well-placed grip holds the brush through geometry — opposing forces from thumb, index, middle, and ring finger — not through brute clenching.
Five Common Grip Mistakes and How to Fix Them
Years of teaching reveal the same errors appearing again and again. Each one produces a specific symptom in your strokes, which means you can often diagnose the problem by looking at your writing — even without a mirror or a teacher watching your hand.
- The death grip (excessive tension): Your fingers squeeze the shaft until your hand trembles. Strokes come out shaky with uneven edges, especially on long horizontal and vertical lines. To fix this, consciously exhale before each stroke and imagine holding a live bird — firm enough that it can't escape, gentle enough that you don't hurt it. Correct brush grip pressure for smooth strokes means your fingernails stay their normal color, not blanched white.
- Collapsed palm (fingers curling inward): Instead of maintaining the hollow "egg space," your fingers fold toward your palm, closing the gap entirely. This restricts wrist rotation and forces your entire arm to compensate for movements your fingers should handle. The fix: periodically glance at your palm mid-practice. If you can't see daylight through the center of your hand, open your fingers outward until the arch returns. Your ring finger's outward push is usually the missing element.
- Thumb riding over index finger: Your thumb creeps up and over the top of your index finger instead of pressing the shaft from its own independent position. This collapses the tiger's mouth into a pinch, eliminates the opposing force structure, and tilts the brush sideways. The correction is spatial: your thumb pad and index finger pad should face each other across the shaft, never stack vertically. If they overlap, pull your thumb back to its own lane on the left-rear side of the handle.
- Brush tilting toward the body: The shaft leans inward rather than standing vertical, a problem noted as the most commonly seen mistake — even among experienced calligraphers. It happens when your wrist drops below neutral or when your index finger overpowers your ring finger's outward push. The result: strokes thicken unevenly on one side. Fix it by checking that your wrist stays level and your ring finger actively resists the inward pull of the top three fingers.
- Pinky floating away from ring finger: Your little finger drifts outward or curls under your palm instead of pressing snugly against the ring finger. Without that buttress support, your ring finger loses its outward pushing power, and the entire counterbalance system weakens. The sensation cue: you should feel constant light contact between the sides of your pinky and ring finger throughout every stroke. If air gaps appear between them, tuck the pinky back in.
Notice the pattern: most mistakes involve one finger abandoning its role, which forces neighboring fingers to overcompensate. The five-finger system works as a team. When one member checks out, the whole structure degrades.
What Correct Grip Should Feel Like Physically
Descriptions of finger positions are useful, but they don't tell you what "right" feels like from the inside. Here's how to recognize correct grip through sensation rather than visual checking alone.
Firm but not rigid. Your fingers maintain steady contact with the shaft, but your finger joints can still flex. If someone pressed down on your brush tip toward the paper, your fingers would absorb the force with a slight give — like a spring — rather than locking solid or collapsing entirely.
Stable but not locked. The brush doesn't wobble or rotate unintentionally, yet you can deliberately roll it between your fingertips with minimal effort. Stability comes from balanced opposing forces, not from clamping pressure. The moment you feel your hand "gripping harder" to maintain control, something in your posture or finger placement has shifted and needs correction.
Free range of motion in the fingertips. With the brush held in position, try wiggling just your fingertips — tiny movements, a millimeter or two. If you can do this without the brush jumping or your grip failing, your hold is in the right zone. This fingertip mobility is what allows you to make the subtle pressure variations that give strokes their life: the slight thickening at a turn, the tapering at a stroke's end, the controlled bounce of a dot.
One last physical cue that experienced calligraphers describe: the brush should feel like a natural extension of your hand rather than a foreign object you're restraining. When grip is correct, you stop noticing the brush as a separate thing. Your attention moves past your fingers and into the tip itself, as if you could feel the paper's texture directly through the bristles. That transparency — where the tool disappears and only the stroke remains — is the clearest sign that your grip has moved from mechanical correctness into genuine skill.
Diagnosing problems is essential, but correction only sticks through repetition. The grip patterns you've built need to be reinforced with deliberate, progressive exercises that train your muscles to default to the right positions without conscious thought.
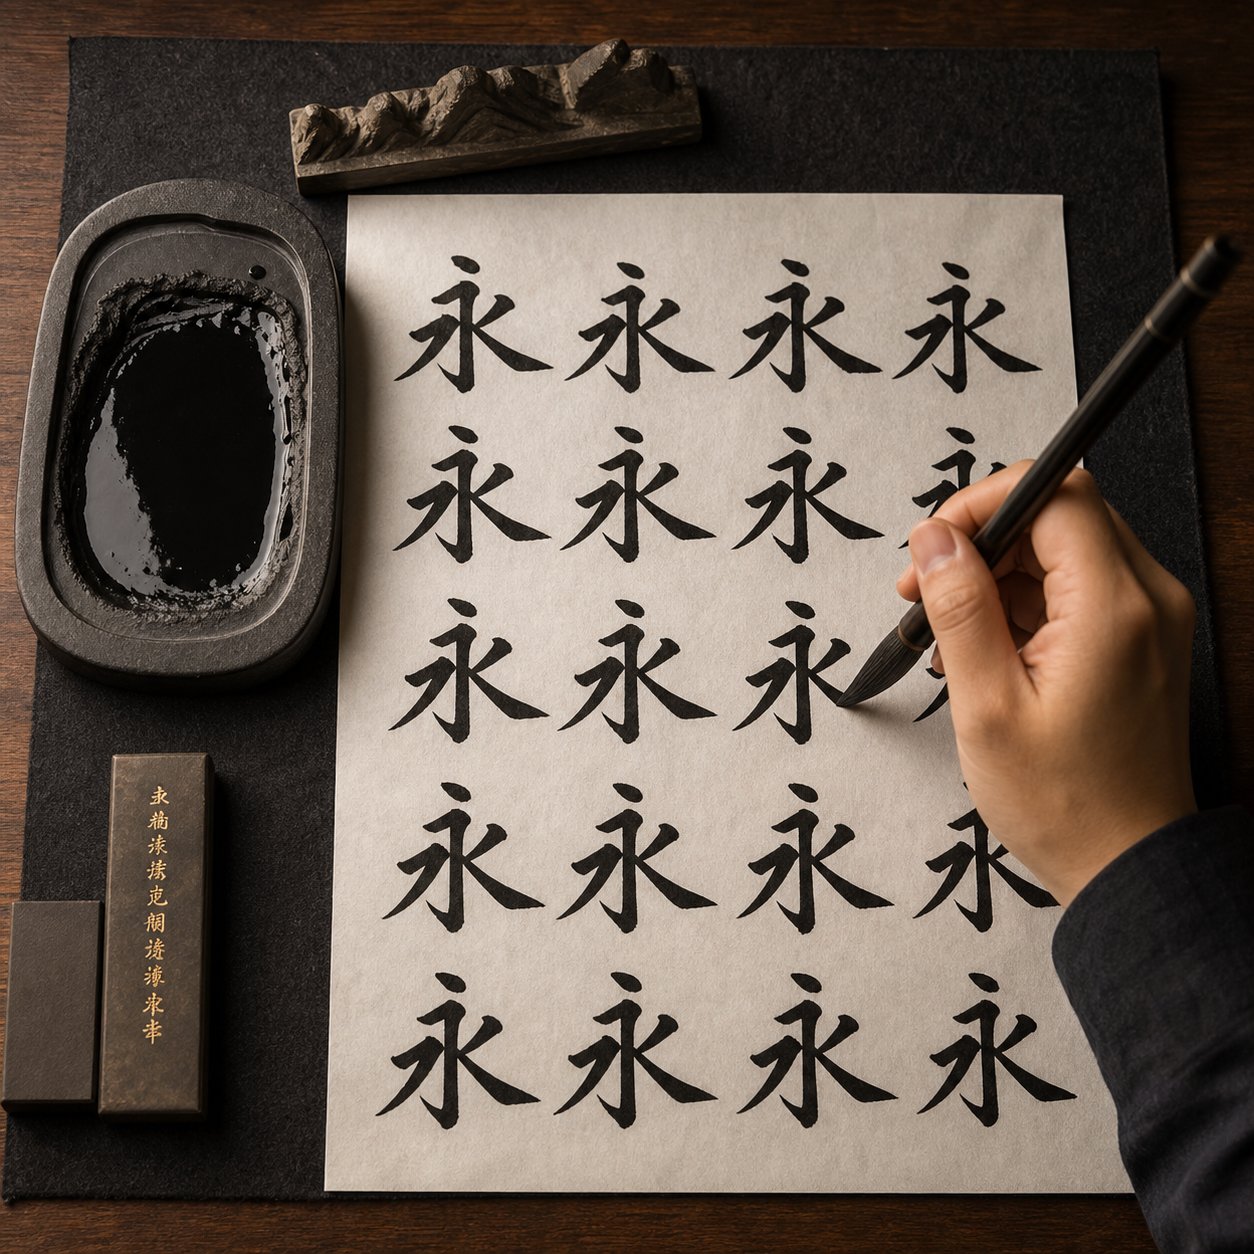
Step 8 - Practice Exercises to Build Lasting Muscle Memory
Knowing the correct grip and actually defaulting to it without thinking are two very different things. Muscle memory bridges that gap. It's the process of repeating a movement so frequently that your hand reproduces it automatically — no conscious checklist required. The question is how to build muscle memory for brush holding in a way that's progressive, sustainable, and actually sticks.
The exercises below move from zero-pressure exploration to ink-on-paper application. Each stage reinforces the grip patterns you've learned while gradually increasing the demands on your hand.
Air Drawing Exercises to Build Grip Memory
Before ink touches paper, your hand needs to internalize the feeling of a correct hold under movement. Air drawing removes every variable except grip itself — no ink flow to worry about, no stroke quality to judge, just your fingers maintaining proper position while the brush moves through space.
Hold your brush vertically in the five-finger grip. Check your hollow palm, confirm your pinky presses against your ring finger, and let your wrist float. Then draw slow, continuous circles in the air — clockwise for thirty seconds, counterclockwise for thirty seconds. Keep the circles small at first, roughly the size of a tennis ball. Your goal isn't artistic. It's maintaining consistent finger pressure and palm openness while the brush changes direction repeatedly.
You'll notice something immediately: certain parts of the circle feel natural, while others tempt your grip to shift. The moment the brush moves leftward, your thumb may press harder. When it sweeps downward, your ring finger might disengage. These micro-failures are exactly what air drawing reveals — and what repetition corrects.
Expand the circles gradually over several sessions. Larger arcs recruit your wrist and elbow, testing whether your grip stays stable as the kinetic chain lengthens. If your palm collapses or your fingers rearrange themselves during wider movements, shrink back down and rebuild.
The Yong Character Drill for Stroke Control
Once your grip holds steady through air movement, it's time to test it against real resistance. The character 永 (yong, meaning "eternal") has served this purpose for centuries. Known as the Eight Principles of Yong (永字八法), this single character contains all eight fundamental strokes of Chinese calligraphy: the dot, horizontal, vertical, hook, rising, left-falling short, left-falling long, and right-falling strokes.
The yong character drill for brush control works because it forces your grip to handle every directional challenge within one compact exercise. A horizontal stroke tests lateral stability. The hook demands a sudden direction change without your fingers losing position. The falling strokes require controlled acceleration while maintaining palm hollowness.
Here's how to use it as a grip exercise rather than a calligraphy exercise:
- Write 永 at slow speed, focusing entirely on grip sensation. Ignore stroke beauty. Instead, monitor whether your thumb pressure stays constant, your palm stays hollow, and your pinky maintains contact with your ring finger throughout all eight strokes.
- Pause between each stroke to reset. Check your finger positions. If anything has drifted — thumb riding over index finger, palm collapsing, ring finger disengaging — correct it before the next stroke begins.
- Repeat the character ten times per session. By the seventh or eighth repetition, you'll notice your corrections becoming smaller. Your hand starts remembering where each finger belongs without the conscious reset.
- Increase speed gradually over days. Once you can write 永 slowly with zero grip drift, speed up slightly. Faster writing exposes grip weaknesses that slow practice hides — particularly during transitions between strokes where your fingers want to rearrange.
- Write 永 in different sizes. Start at 5 cm with a low grip, then write it at 8 cm with a mid-shaft grip, then at 12 cm with a high grip. Each size tests a different grip configuration while the stroke sequence stays familiar.
This single character, practiced with grip awareness as the primary focus, teaches your hand more about stable brush holding than pages of random characters ever could.
Building a Daily Grip Practice Routine
Calligraphy brush grip practice exercises only work if you do them consistently. A daily calligraphy grip training routine doesn't need to be long — five minutes before each practice session is enough to reinforce correct patterns and prevent old habits from resurfacing.
Structure those five minutes like this:
- Minutes 1-2: Air circles. Hold the brush and draw circles in the air without ink. Focus on maintaining hollow palm and balanced finger pressure through direction changes. This warms up your hand and resets your grip awareness.
- Minutes 2-3: Snatch test and self-check. Pause, examine your grip visually. Run through the checkpoints — tiger's mouth open, pinky supporting ring finger, wrist floating. If you have a partner, do a quick snatch test. If solo, try the ten-percent relaxation test from the previous chapter.
- Minutes 3-5: Slow 永 repetitions. Write the yong character three to five times at deliberate speed, treating each one as a grip diagnostic rather than a calligraphy piece. Note which strokes cause your grip to shift and give those extra attention.
This brief routine, repeated daily, builds the kind of deep muscle memory that makes correct grip feel automatic within weeks rather than months. Consistency matters far more than duration — short, focused sessions repeated every day outperform long irregular ones because muscle memory develops through frequency of repetition, not volume.
Frame your progress in three stages. First, basic grip for control: your fingers land in the right positions and stay there during simple strokes. Second, refined grip for consistency: your hand maintains correct form automatically across different character sizes and script styles without conscious monitoring. Third, expressive grip for artistic freedom: your grip adapts fluidly to the demands of each moment, loosening for cursive flow and firming for structural precision, guided by intention rather than habit.
Each stage builds on the last. You can't skip to expressive freedom without first establishing reliable control, and you can't maintain control without the muscle memory that only daily repetition creates. Five minutes a day, every day. That's the commitment. The brush will teach you the rest.
Frequently Asked Questions About Holding a Chinese Calligraphy Brush
1. How tight should I hold a Chinese calligraphy brush?
Your grip should feel like a firm handshake rather than a vise. Use the snatch test to calibrate: if someone can easily pull the brush from your hand, you're too loose. If your knuckles turn white, you're too tight. The correct pressure keeps the brush stable through balanced opposing finger forces while allowing your fingertips to make subtle micro-adjustments for stroke variation. Your fingernails should stay their normal color, and you should be able to wiggle your fingertips slightly without the brush jumping.
2. What is the difference between the five-finger and three-finger brush grip?
The five-finger method uses all digits in a coordinated system of opposing forces, making it stable and versatile for most character sizes and script styles. The three-finger method uses only the thumb, index, and middle finger, concentrating contact into fewer but more sensitive fingertips. This gives heightened tactile feedback ideal for small characters and seal script. However, the three-finger technique requires a suspended arm for stability and is generally recommended for advanced practitioners who have already mastered the five-finger foundation.
3. Where on the brush shaft should my fingers be placed?
Grip height depends on what you're writing. For small, precise characters under 5 cm like regular script, hold in the lower third of the shaft near the ferrule for maximum control. For medium characters between 5 and 10 cm, grip at mid-shaft to balance control with fluidity. For large characters over 10 cm or expressive cursive work, hold in the upper third to allow sweeping arm-driven strokes. Think of grip height as a dial you adjust based on character size and script style rather than a fixed setting.
4. Why do my calligraphy strokes look shaky even with practice?
Shaky strokes almost always trace back to excessive grip tension, known as the death grip. When your fingers squeeze too hard, the tension travels up through your wrist and forearm, causing micro-tremors that show up as uneven stroke edges. The fix involves consciously relaxing your hold, breathing from your abdomen before each stroke, and ensuring your shoulder stays dropped rather than hiked toward your ear. Check that your palm remains hollow and that no single finger is overcompensating for another that has drifted out of position.
5. Do I need to use a suspended wrist when practicing Chinese calligraphy?
Not always. Wrist position depends on character size. For small characters under an inch, a resting wrist placed on your opposite hand provides maximum stability. For medium characters between 1 and 4 inches, a suspended wrist floating above the table gives you the lateral range needed for fluid transitions. For large-format work, both wrist and elbow should suspend completely so your entire arm can drive broad strokes. Most beginners start with a resting wrist for control, then progress to suspended positions as their arm strength and stability develop.