The Building Blocks of Every Chinese Character
Imagine a writing system with tens of thousands of unique characters, each one built from the same small set of brushstrokes. That is exactly how Chinese writing works. Every character you see, whether it has three strokes or thirty, breaks down into a combination of just eight fundamental movements of the brush. These are the basic Chinese calligraphy strokes, and they are the DNA of the entire script.
What Are Basic Chinese Calligraphy Strokes
A Chinese stroke is a single, uninterrupted movement of the brush from the moment it touches the paper to the moment it lifts away. In calligraphy, each stroke carries specific requirements for pressure, angle, speed, and direction that distinguish it from casual handwriting. Writing in Chinese is not about drawing shapes. It is about executing precise, expressive movements that give each character its structure and energy. What does Chinese writing look like at its core? It looks like a deliberate choreography of the brush, where every line has a defined beginning, middle, and end.
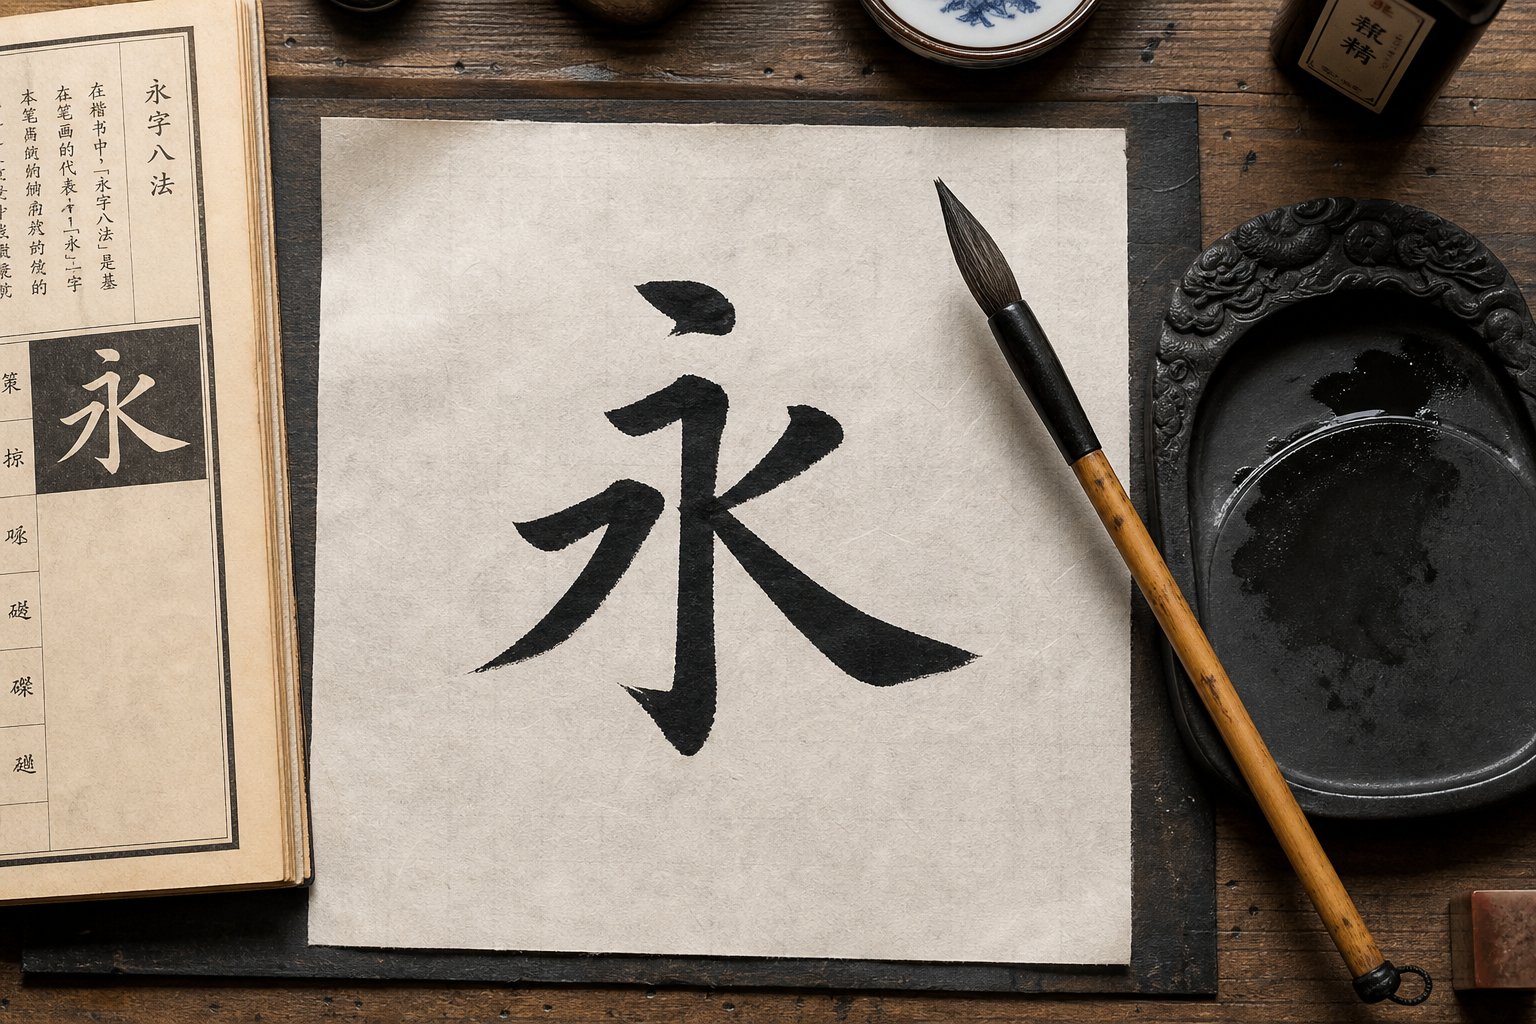
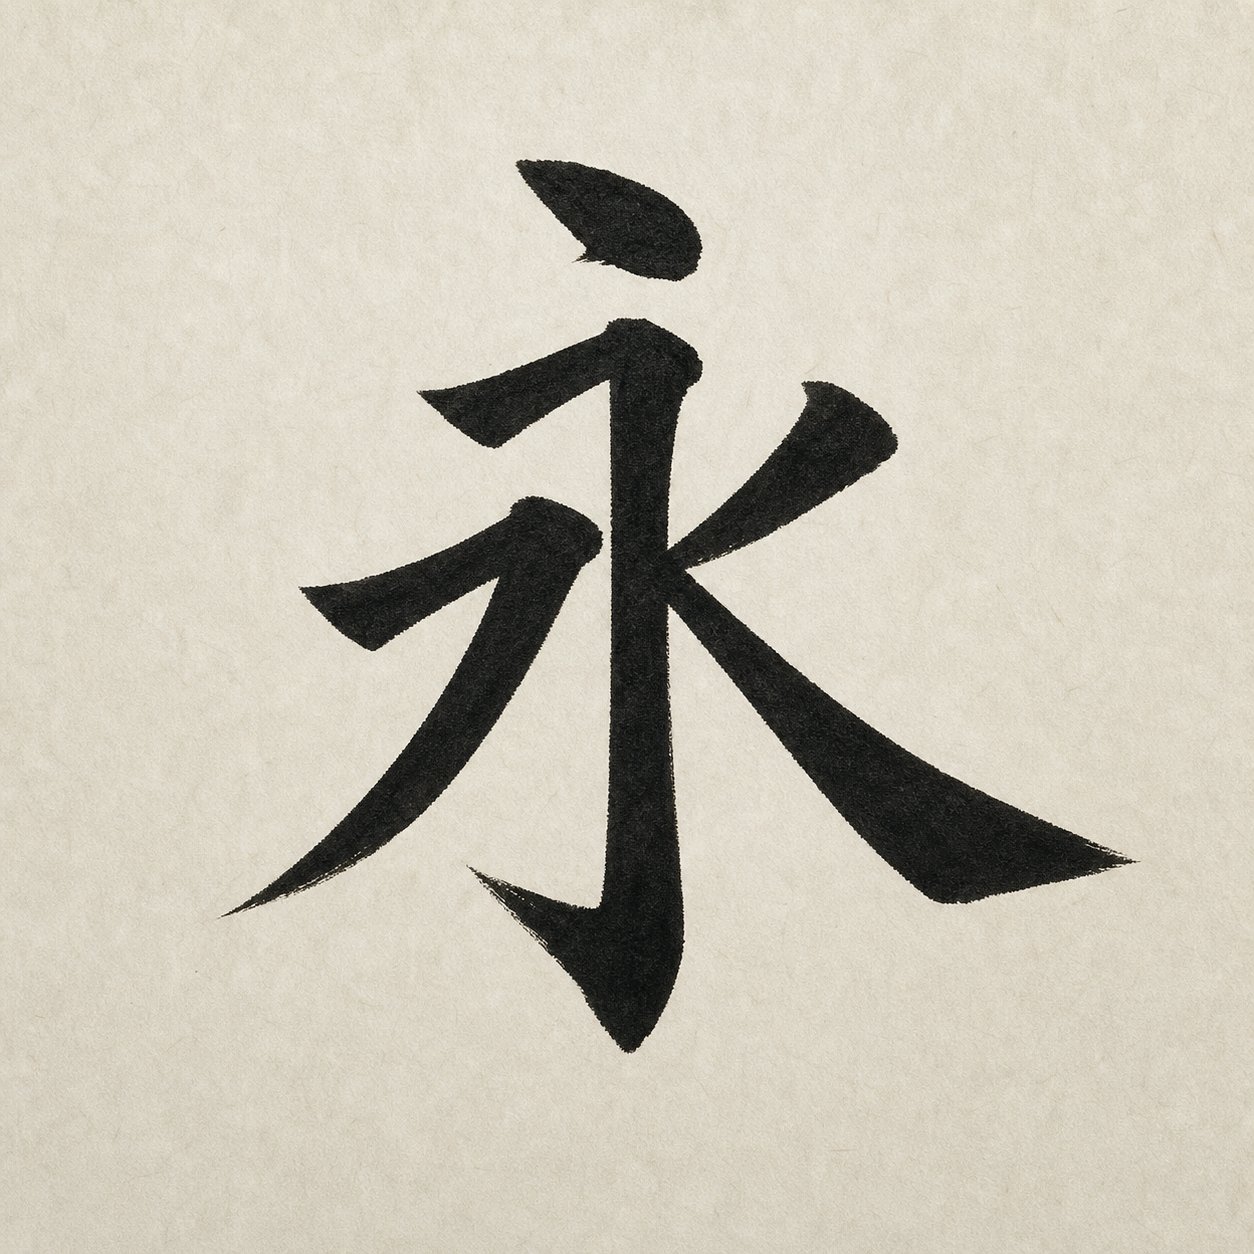
The Chinese writing system, called hanzi (汉字), uses these strokes as its alphabet equivalent. While English builds words from 26 letters, Chinese builds characters from eight stroke types. Each Chinese stroke functions as an irreducible unit. You cannot simplify it further without losing meaning or structure. The traditional count of eight comes from the character 永 (yong, meaning "eternity"), which contains one instance of every fundamental stroke type within a single character.
Why Strokes Are the Foundation of Chinese Writing
So how does Chinese writing work at a practical level? You learn the strokes first, then combine them into radicals, and finally assemble radicals into complete characters. This progression means that mastering eight movements gives you the tools to construct thousands of Chinese writing symbols. The system is remarkably efficient once you understand its logic.
Master eight basic strokes, and you hold the key to writing over 50,000 Chinese characters. Every complex character is simply a new arrangement of the same fundamental movements.
Calligraphy strokes differ from everyday handwriting strokes in one critical way: brush technique and artistic intention. Writing in Chinese language with a ballpoint pen simplifies each stroke to a line. Writing with a brush transforms each stroke into an expressive gesture where thickness, taper, and ink texture all communicate skill and feeling. This guide treats strokes as calligraphy movements, not just marks on paper.
This article walks you through a complete self-study path. You will learn which tools to choose, how to hold your brush, the three phases hidden inside every stroke, detailed technique for all eight stroke types, stroke order rules, and how to progress from isolated strokes to writing real characters. Each section builds on the last, giving you a structured curriculum you can follow at your own pace.
Essential Tools and Materials for Stroke Practice
Your brush, ink, and paper are not passive accessories. They are active participants in every stroke you make. The wrong combination can turn a confident movement into a blotchy mess, while the right setup lets you focus entirely on technique. In Chinese tradition, these materials carry a name that reflects their importance: the Four Treasures of the Study (文房四宝, wen fang si bao). They include the brush, ink, paper, and inkstone, and each one directly shapes how your chinese brush strokes look on the page.
Choosing Your First Calligraphy Brush
Calligraphy brushes are made from animal hair bound to a bamboo or wooden handle. The hair type determines stiffness, ink absorption, and the kind of lines you can produce. Brushes fall into three broad categories: soft hair (goat or sheep), stiff hair (weasel or wolf), and mixed hair that blends both. For someone beginning to learn chinese calligraphy, a medium-stiffness mixed-hair brush is the best starting point. It offers enough spring to control stroke direction while still holding adequate ink for smooth, continuous lines.
Look for a brush labeled "medium" in size, roughly 3 to 4 centimeters in tip length. A tip that is too large makes small strokes unwieldy, while one that is too small limits your ability to practice pressure variation. When you dip the brush in water and press it gently against your palm, the hairs should come to a neat point. That responsiveness is what allows you to execute each chinese brush stroke with precision.
Ink and Paper Selection for Stroke Practice
You have two ink options: pre-ground liquid ink or an ink stick that you grind yourself on an inkstone. Liquid ink is convenient and consistent, making it ideal for daily practice sessions. Grinding an ink stick with water on a stone gives you full control over ink density, and many calligraphers find the slow, circular grinding motion a meditative warm-up. For beginners, liquid ink removes one variable so you can concentrate on brush technique.
Ink consistency matters more than you might expect. Ink that is too thin produces pale, bleeding lines with fuzzy edges. Ink that is too thick clumps on the brush tip and creates uneven textures. You want a consistency similar to whole milk: fluid enough to glide but dense enough to hold a crisp edge.
Paper choice has an equally direct effect on your chinese brushstrokes. Xuan paper (rice paper) is the traditional choice for finished work, but its high absorbency makes ink spread quickly, which is unforgiving for beginners. Start with gridded practice paper, sometimes called maobian paper. It absorbs ink at a moderate rate, gives you reference lines for stroke proportion, and costs far less, so you can practice freely without worrying about waste.
Setting Up Your Practice Space
Beyond the Four Treasures, a few additional items make your sessions smoother. Here is a recommended starter kit:
- Mixed-hair brush (medium size) — balances control and ink flow for all eight basic strokes
- Bottled liquid ink (100-250 ml) — consistent density without preparation time
- Gridded practice paper (maobian or yuan shu zhi) — moderate absorbency with printed guides for character proportion
- Felt pad (mao zhan) — placed under your paper to absorb excess ink and prevent bleed-through onto your desk
- Water dish and cloth — for rinsing your brush between strokes and wiping excess moisture
- Paperweight (zhen chi) — keeps your sheet flat and steady while you write
A flat, uncluttered table at a comfortable height completes the setup. Position your ink and water dish to the side of your writing hand so you can reload the brush without crossing over wet strokes. Good lighting from the left (or right, if you are left-handed) prevents your hand from casting shadows on the area where you are working.
Each material choice feeds directly into stroke quality. A brush with proper spring lets you modulate pressure during a single stroke. Ink at the right consistency gives you clean edges on horizontals and sharp tapers on falling strokes. Paper with controlled absorbency means the line you see is the line you intended. Getting these fundamentals right removes frustration and lets your attention stay where it belongs: on the movement of the brush itself.
How to Hold Your Brush and Position Your Body
You have your brush, ink, and paper ready. But before the tip touches the page, there is one skill that determines whether your stroke writing will feel controlled or chaotic: how you hold the brush. Grip and posture are the invisible architecture behind every beautiful line. Get them wrong, and no amount of practice fixes the wobble in your strokes. Get them right, and the brush becomes an extension of your hand rather than a clumsy stick you are fighting against.
If you have ever wondered how do you write in Chinese with such fluid, confident lines, the answer starts here, not with the strokes themselves, but with the physical relationship between your body and the brush.
The Five-Finger Brush Grip Method
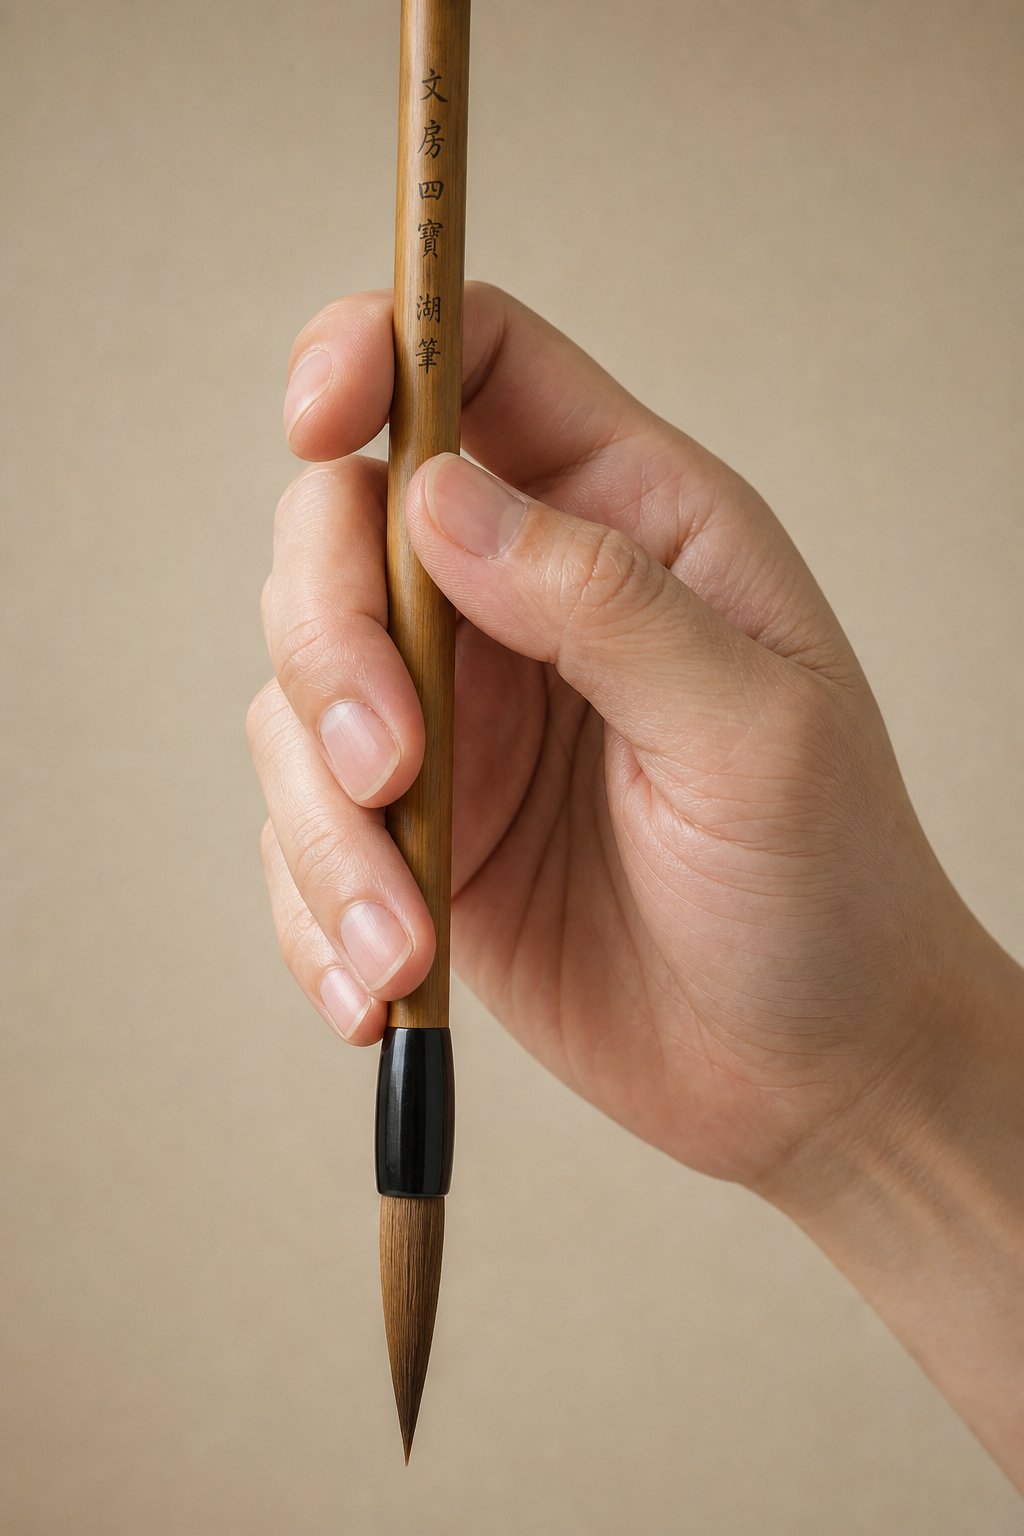
The traditional Chinese brush grip uses all five fingers, each with a specific job. Unlike holding a pen at an angle, you hold a calligraphy brush nearly vertical, perpendicular to the paper. This vertical position allows the tip to move freely in any direction, which is essential when you write in chinese calligraphy where strokes travel left, right, up, and down within a single character.
Here is the step-by-step process for achieving the correct five-finger hold:
- Thumb (press inward) — Place the pad of your thumb against the left side of the brush shaft, roughly one-third of the way up from the base of the bristles. Press inward toward the brush.
- Index finger (press inward) — Position your index finger on the opposite side of the shaft from your thumb, pressing inward to create a pinching force. Your thumb and index finger work as a pair to stabilize the brush.
- Middle finger (hook inward) — Curl your middle finger around the shaft just below your index finger. It hooks the brush toward your palm, adding a third point of contact and preventing the brush from slipping forward.
- Ring finger (push outward) — Rest the nail-side of your ring finger against the shaft, pushing gently outward. This counterbalances the inward pressure from your middle finger and keeps the brush centered.
- Pinky finger (support) — Tuck your pinky against your ring finger for support. It does not touch the brush directly but reinforces the outward push of the ring finger.
When the grip is correct, your palm forms a hollow space, as if you are holding a small egg inside it. The brush should stand upright without tilting, and you should be able to rotate it slightly between your fingers. This openness in the palm gives you the micro-adjustments needed for pressure changes during strokes in calligraphy. If your hand feels clenched or tense, loosen your grip. Tension transfers directly into shaky lines.
Incorrect grip is the single most common reason beginners struggle with stroke consistency. Many people default to a pen-holding angle, which locks the brush into producing only one line width and limits directional freedom. The vertical five-finger method feels unusual at first, but it unlocks the full range of thick-to-thin variation that defines writing in chinese calligraphy.
Posture and Arm Position for Stroke Control
Your grip handles precision. Your posture handles power and stability. Sit upright with both feet flat on the floor, shoulders relaxed and level. Your back should be straight but not rigid. Imagine a string pulling the crown of your head gently upward. This alignment keeps your breathing steady and prevents fatigue during longer practice sessions.
Arm position is where most beginners need to make a conscious adjustment. There are three levels of wrist and arm elevation, and each suits a different scale of work:
- Resting wrist (枕腕 zhen wan) — Your wrist sits on the table or on your opposite hand. Suitable only for very small characters where minimal movement is needed.
- Suspended wrist (悬腕 xuan wan) — Your wrist lifts off the table while your elbow remains near the surface. This is the standard position for regular-sized character practice and gives you enough range to execute all basic strokes comfortably.
- Suspended elbow (悬肘 xuan zhou) — Both wrist and elbow float above the table. Required for large characters and expressive work where your entire arm drives the movement.
For learning how to write mandarin characters at a standard practice size, the suspended wrist method is your target. It feels tiring at first because muscles in your forearm are doing work they are not accustomed to. That fatigue fades within a few weeks of daily practice.
Keep your non-writing hand flat on the paper or gently holding the sheet steady. Position your body squarely facing the table rather than angled to one side. When your torso, shoulder, arm, and wrist are aligned, the brush moves as a unified system. You will notice that stroke writing becomes smoother because the motion originates from your arm and shoulder rather than from cramped finger movements alone.
How to write mandarin with real control comes down to this: your fingers manage the brush angle, your wrist guides direction, and your arm provides the sweeping force. Each joint has a role, and good posture keeps them all working together. With your grip set and your body positioned, you are physically ready to learn what happens during the three distinct phases every stroke passes through.
The Three Phases of Every Calligraphy Stroke
Every stroke in Chinese calligraphy, regardless of direction or shape, follows the same internal structure. It has a beginning, a middle, and an end. In Chinese, these three phases carry specific names: 起笔 (qi bi), 行笔 (xing bi), and 收笔 (shou bi). Think of them as the grammar of stroke writing. Just as a sentence needs a subject, verb, and object to make sense, a stroke in chinese needs entry, body, and exit to look complete and intentional.
This three-phase framework is what separates deliberate calligraphy from casual mark-making. It gives you a mental checklist for every single movement of the brush, and it provides the vocabulary you need to diagnose problems when a stroke does not look right. Once you internalize these phases, you can apply them to all eight chinese calligraphy strokes and to every character you will ever write.
起笔 Entry Point and Initial Contact
起笔 (qi bi) is the moment your brush first meets the paper. It is not a simple touch-down. The traditional approach to qi bi involves a counterintuitive move: you start by moving the brush in the opposite direction of the intended stroke. Writing a horizontal line that travels left to right? Your brush tip first nudges slightly to the left before reversing course. Planning a vertical stroke downward? The tip moves briefly upward first.
This reverse-entry technique is called "hiding the tip" (藏锋, cang feng). It tucks the sharp beginning of the brush tip inside the stroke body, creating a rounded, contained starting point rather than a pointed or ragged one. The pressure at entry is moderate, just enough to spread the brush hairs slightly and establish the stroke's initial width. Too much pressure here creates a blob. Too little leaves a wispy, uncertain mark.
The angle of entry also varies by stroke type. A horizontal stroke enters at roughly 45 degrees from upper-left before leveling out. A vertical stroke enters with a slight rightward press before dropping straight down. A dot plunges in at a steep angle with immediate pressure. Each chinese character stroke has its own entry signature, but the principle remains constant: reverse briefly, then commit to the intended direction.
行笔 The Stroke Body and Movement
行笔 (xing bi) is the sustained travel of the brush between entry and exit. This is where the stroke gets its length, its character, and its energy. Three variables define the xing bi phase: speed, pressure, and direction.
Speed controls the ink deposit. Move too fast, and the brush skips across the paper leaving dry, broken textures. Move too slowly, and ink pools, creating thick spots and bleed. The ideal pace is steady and deliberate, like drawing a bow across a violin string with even tension.
Pressure determines line width. Consistent pressure produces an even-width stroke body, which is what you want for standard horizontal and vertical strokes. Gradual pressure increase creates a thickening line, useful for the right-falling stroke (na). Gradual release creates a taper, essential for the left-falling stroke (pie). Your ability to modulate pressure during xing bi is what gives chinese character strokes their expressive variation.
Direction seems obvious, but it requires active attention. The brush tip must stay centered within the stroke path at all times. This principle, called zhong feng (中锋, centered tip), means the tip always points opposite to the direction of travel. If you are moving right, the tip trails to the left. If you are moving down, the tip trails upward. Losing center produces a flat, scraping quality that weakens the stroke visually.
收笔 Ending the Stroke with Control
收笔 (shou bi) is how you finish. Like qi bi, it often involves a reversal. Before lifting the brush, you briefly push the tip back in the opposite direction of travel, then lift. This reverse-and-lift creates a clean, rounded ending that mirrors the contained beginning. The stroke looks complete, as if the energy is sealed inside rather than leaking out the end.
Not every stroke uses a full reversal at shou bi. Some strokes, like the left-falling pie, end with a gradual lift that tapers the line to a point. Others, like the hook (gou), redirect sharply into a new direction before lifting. The exit technique is what gives each of the eight strokes its distinctive finishing shape. But the underlying discipline is the same: you end with intention, never by simply running out of momentum or yanking the brush away.
The table below shows how these three phases play out differently across several stroke types, giving you a quick reference for the chinese strokes names and their phase-by-phase execution:
| Stroke | 起笔 (Entry) | 行笔 (Body) | 收笔 (Exit) |
|---|---|---|---|
| 横 Heng (Horizontal) | Reverse left at 45 degrees, moderate pressure | Travel right with even pressure and steady speed, tip centered | Pause, reverse slightly left, lift |
| 竖 Shu (Vertical) | Reverse upward with slight rightward press | Travel downward with consistent pressure, tip trailing up | Pause, reverse slightly upward, lift (or taper for a pointed ending) |
| 点 Dian (Dot) | Enter at steep angle with quick, firm pressure | Very short travel downward-right, pressure peaks immediately | Reverse upward-left within the dot body, lift without trailing |
| 撇 Pie (Left-falling) | Reverse right, press to establish width | Travel lower-left, gradually reducing pressure | Lift smoothly off the paper to create a tapered point, no reversal |
| 捺 Na (Right-falling) | Enter lightly at upper-left | Travel lower-right, gradually increasing pressure to maximum | Pause at thickest point, drag rightward while lifting to form a flat tail |
Notice the pattern: character strokes chinese calligraphers consider well-executed always show evidence of all three phases. A horizontal stroke without proper qi bi looks like it was started mid-motion. A vertical stroke without controlled shou bi looks abandoned. The three-phase framework (sometimes referenced as strokes中文 terminology in bilingual learning resources) gives you the analytical lens to see exactly where a stroke succeeds or fails.
Why does this matter for your practice? Because when a stroke looks wrong, the problem almost always lives in one specific phase. Wobbly middles point to an xing bi issue. Blobby beginnings reveal a qi bi problem. Abrupt endings expose weak shou bi control. Instead of vaguely repeating a stroke hoping it improves, you can target the exact phase that needs work. That precision turns repetitive practice into deliberate practice, and deliberate practice is what builds real skill.
With this three-phase vocabulary in place, you have the mental framework to approach each of the eight fundamental strokes with clarity. Every stroke you learn next will follow this same entry-body-exit logic, just with different angles, pressures, and directions at each phase.
The Eight Fundamental Strokes in the 永 Character
There is one character in Chinese that calligraphers have used for centuries as a complete training exercise: 永 (yong, meaning "eternity"). Why this character? Because it contains all eight basic calligraphy strokes within a single, compact form. Every fundamental movement your brush will ever need to make appears somewhere in 永. Practicing this one character is like running scales that cover every note on the instrument.
This concept, known as 永字八法 (yong zi ba fa, "the eight principles of the character yong"), has been a cornerstone of calligraphy education since the Tang Dynasty. Rather than drilling strokes in isolation, you can use 永 as a map that shows how the chinese basic strokes relate to each other spatially and rhythmically. Below, you will find each stroke explained step by step with technique details rooted in the three-phase framework from the previous section.
| Stroke Name | Pinyin | Direction | Key Technique Tip | Difficulty Level |
|---|---|---|---|---|
| 横 | heng | Left to right | Maintain even pressure through the body; reverse at both ends | Beginner |
| 竖 | shu | Top to bottom | Keep the tip centered; choose a rounded or pointed ending | Beginner |
| 点 | dian | Downward-right (short) | Quick entry with firm pressure; lift within the dot body | Beginner |
| 提 | ti | Lower-left to upper-right | Start heavy, release pressure rapidly as you flick upward | Intermediate |
| 撇 | pie | Upper-right to lower-left | Gradually lighten pressure to create a natural taper | Intermediate |
| 捺 | na | Upper-left to lower-right | Increase pressure progressively; end with a flat "foot" | Intermediate |
| 钩 | gou | Attached to vertical or horizontal | Pause, compress, then flick sharply in the hook direction | Advanced |
| 折 | zhe | Direction change within one stroke | Pause at the corner, re-establish pressure, then continue | Advanced |
The table above gives you a progression path from simplest to most complex. Start with heng, shu, and dian before moving to the intermediate and advanced strokes. This step by step basic calligraphy strokes sequence builds your muscle memory gradually rather than overwhelming you with too many variables at once.
横 Heng and 竖 Shu — Horizontal and Vertical Strokes
The horizontal line in chinese writing is the most common stroke you will encounter. In 永, it appears as the short crossbar near the top. To execute heng, reverse your brush tip slightly to the left at about 45 degrees, press down to establish width, then travel smoothly to the right with even pressure. Your arm, not your fingers, drives the lateral movement. At the end, pause briefly, reverse the tip back to the left, and lift. The result should look like a slightly bowed beam: contained at both ends with a subtle fullness in the middle.
The physical sensation of a good heng is one of steady resistance, like dragging a fingertip across velvet. If you feel the brush skipping or stuttering, you are moving too fast or pressing too lightly during the xing bi phase.
竖 (shu) is the vertical backbone of 永, running straight down through the center. Enter by pressing slightly to the right, then drop the brush straight down with the tip trailing upward. Consistent pressure here is critical. Any wavering in your wrist shows immediately as a wobble in the line. For the ending, you have two options: a rounded finish (reverse upward and lift, called 垂露 chui lu or "hanging dewdrop") or a pointed finish (gradually lift while still moving down, called 悬针 xuan zhen or "suspended needle"). In 永, the vertical uses the rounded ending.
Together, heng and shu form the structural skeleton of most characters. A horizontal line in chinese calligraphy represents stability, while the vertical represents strength. When you can write both with confidence, you already have the tools for hundreds of simple characters like 十 (shi, ten) and 王 (wang, king).
撇 Pie and 捺 Na — Left and Right Falling Strokes
撇 (pie) sweeps from upper-right to lower-left, appearing in 永 as the stroke that branches off to the left. Begin with a firm entry, pressing to the right to establish the stroke's thickest point at the top. Then sweep downward and to the left while gradually releasing pressure. The stroke should taper naturally to a fine point as your brush lifts off the paper. Imagine the motion of flicking water off your fingertips. The energy moves outward and dissipates at the end.
A well-executed pie feels like a controlled exhale. The beginning is deliberate and grounded, the middle accelerates slightly, and the ending releases. If your pie ends bluntly rather than tapering, you are maintaining too much pressure too long. Start releasing earlier than you think you should.
捺 (na) is the mirror counterpart, falling from upper-left to lower-right. In 永, it forms the sweeping stroke on the lower-right side. The technique is the opposite of pie: you enter lightly with minimal pressure, then gradually press harder as you travel down and to the right. At the stroke's lowest point, pause and press to maximum width, creating the characteristic "foot" (also called the yan wei, or "wild goose tail"). From there, drag the brush to the right while slowly lifting to create a flat, tapered exit.
Na is one of the mandarin basic strokes that beginners find most challenging because it demands patience. The gradual pressure buildup requires you to resist the urge to press hard immediately. Think of it as a crescendo in music: the power arrives at the end, not the beginning. The visual result is a stroke that looks like a gentle slope ending in a firm, confident platform.
点 Dian, 提 Ti, 折 Zhe, and 钩 Gou — Dot, Flick, Turn, and Hook
点 (dian) sits at the very top of 永, a small but essential stroke. Do not mistake its size for simplicity. A dot is a full stroke compressed into a tiny space, and it still requires all three phases. Enter at a steep angle with quick, firm pressure. The brush barely travels, moving just slightly downward and to the right. Then reverse upward-left within the body of the dot and lift cleanly. The result is a teardrop or small wedge shape, dense with ink and energy. A good dian looks like a pebble dropped into still water: compact, weighted, and intentional.
提 (ti) is the upward flick, appearing in 永 where a short stroke kicks upward to the right from the lower-left area. Start with the brush pressed firmly at the bottom, then flick upward and to the right while rapidly releasing pressure. The motion is brisk and decisive. Ti should feel like striking a match: a quick, confident gesture that produces a stroke thick at its base and vanishing to a point at its tip. Speed matters here more than in any other stroke. Hesitation produces a lumpy, uncertain line.
折 (zhe) is the turning stroke, where the brush changes direction without leaving the paper. In 永, it appears as the angular connection between the horizontal element and the downward hook. The technique requires you to pause at the corner, slightly lift and re-press the brush to re-establish the tip's position, then continue in the new direction. Think of it as two strokes joined by a controlled pivot. The corner should look crisp, not rounded. If your turns look mushy, you are not pausing long enough at the direction change to reset your brush angle.
钩 (gou) is the hook, and it never exists independently. It always attaches to the end of another stroke, redirecting energy in a sharp, short flick. In 永, the hook appears at the bottom of the vertical stroke, kicking out to the left. To execute it, finish your vertical travel, pause, compress the brush slightly to gather energy, then flick sharply to the left while lifting. The hook should be small, sharp, and energetic, like the barb on a fishhook. The most common mistake is making the hook too large or too rounded. Keep it tight and decisive.
These four strokes round out the complete set of chinese basic strokes. Together with heng, shu, pie, and na, they give you every movement needed to write any character in the Chinese script. Practice them in the order presented in the table above, spending several sessions on each difficulty level before advancing. Aim for consistency over speed: ten identical strokes teach more than fifty rushed ones.
With all eight strokes in your hands, the next question becomes practical: when you sit down to write a character that uses several of these strokes together, which one do you write first? The answer is not random. Chinese writing follows a precise set of stroke order rules that determine the sequence, and those rules exist for good reason.
Stroke Order Rules That Guide Every Character
Chinese character stroke order is not arbitrary. It follows a logical set of principles that have been refined over centuries to produce balanced characters, efficient hand movement, and smooth transitions between strokes. When you understand these rules, you stop guessing which stroke comes next and start writing with the same instinctive sequencing that native writers use.
Think of stroke order as traffic rules for your brush. Without them, strokes collide, spacing falls apart, and your hand constantly backtracks into awkward positions. With them, each stroke flows naturally into the next, and your characters develop a consistent internal rhythm.
Top to Bottom and Left to Right Principles
The two most fundamental rules in chinese writing strokes order govern the general direction of writing across a character. These apply broadly and serve as your default when no other specific rule overrides them.
- Top to bottom (从上到下) — Write upper components before lower ones. In 三 (san, three), you write the top horizontal stroke first, the middle one second, and the bottom one last. The brush works its way down the character systematically.
- Left to right (从左到右) — Write left-side components before right-side ones. In 川 (chuan, river), the three vertical strokes are written from the leftmost to the rightmost. Your hand moves progressively across the character without doubling back.
- Horizontal before vertical (先横后竖) — When a horizontal and vertical stroke cross, write the horizontal first. In 十 (shi, ten), the horizontal heng comes before the vertical shu. This prevents your hand from smearing wet ink on the horizontal stroke.
- Outside before inside (先外后内) — Write enclosing strokes before the components they surround. In 月 (yue, moon), the outer frame strokes come before the two short horizontals inside.
- Inside before closing (先内后封) — When a character has a full enclosure, write the interior strokes before adding the bottom closing stroke. In 日 (ri, sun), the inner horizontal is written before the bottom horizontal seals the box shut.
- Center before sides (先中后两边) — When a character has a prominent central stroke flanked by symmetrical elements, write the center first. In 小 (xiao, small), the central vertical hook comes before the two side dots.
- The convex concave rule (先凸后凹) — For characters with enclosing strokes that wrap around content, bottom-enclosing strokes are written last. In 凶 (xiong, fierce), the interior is completed before the outer frame closes at the bottom.
Horizontal Before Vertical and Enclosure Rules
Rules three through five deserve extra attention because they handle the most common structural situations you will encounter. The horizontal-before-vertical principle applies every time two strokes intersect. The enclosure rules handle the many characters built around box-like frames. Together, these three rules cover the mandarin stroke order logic for a large percentage of everyday characters.
Here is a quick reference showing stroke order chinese learners can use for practice:
| Character | Meaning | Stroke Count | Stroke Order Sequence | Rule Applied |
|---|---|---|---|---|
| 三 | Three | 3 | Top heng → middle heng → bottom heng | Top to bottom |
| 川 | River | 3 | Left shu → middle shu → right shu | Left to right |
| 十 | Ten | 2 | Heng → shu | Horizontal before vertical |
| 月 | Moon | 4 | Left pie → outer zhe → inner heng → inner heng | Outside before inside |
| 日 | Sun | 4 | Left shu → top heng + right zhe → inner heng → bottom heng (closing) | Inside before closing |
| 小 | Small | 3 | Central shu-gou → left dian → right dian | Center before sides |
Why Correct Stroke Order Improves Your Calligraphy
Stroke order is more than a memorization exercise. It directly affects three practical outcomes in your writing. First, it produces better character balance. Writing strokes in the correct sequence means each new stroke is positioned relative to what already exists on the paper, giving you natural reference points for spacing and proportion.
Second, correct chinese words stroke order increases writing speed. The rules minimize unnecessary hand travel. Your brush moves in efficient paths rather than jumping back and forth across the character. This efficiency becomes critical as you progress to faster scripts like running script (行书), where strokes connect fluidly and the order determines which connections are possible.
Third, and most relevant to calligraphy specifically, proper stroke order affects the energy flow within a character. Each stroke's ending position sets up the starting position of the next stroke. When the sequence is correct, these transitions feel natural and the character develops an internal momentum. When the sequence is wrong, you fight against the brush's natural resting position after each stroke, and the character looks disjointed even if individual strokes are well-executed.
Practice these rules with the simple characters in the table above. Write each one ten times, paying attention to how your hand naturally moves from one stroke to the next. You will notice that correct strokeorder chinese calligraphers follow creates a feeling of inevitability, as if each stroke could only lead to the next one in that specific sequence. That feeling is your signal that the rules have become intuitive rather than memorized.
With stroke order principles guiding your sequencing, you are ready to combine individual strokes into complete characters, starting with the simplest forms and building toward more complex structures.
From Individual Strokes to Writing Real Characters
Strokes practiced in isolation are like musical notes played one at a time. They build finger strength and familiarity, but the real satisfaction comes when you combine them into something meaningful. The chinese letter structure works in layers: strokes form simple characters, simple characters become radicals, and radicals combine into compound characters. Each layer builds directly on the one before it, which means your stroke practice already contains the seeds of full character writing.
Simple Characters Using Only Basic Strokes
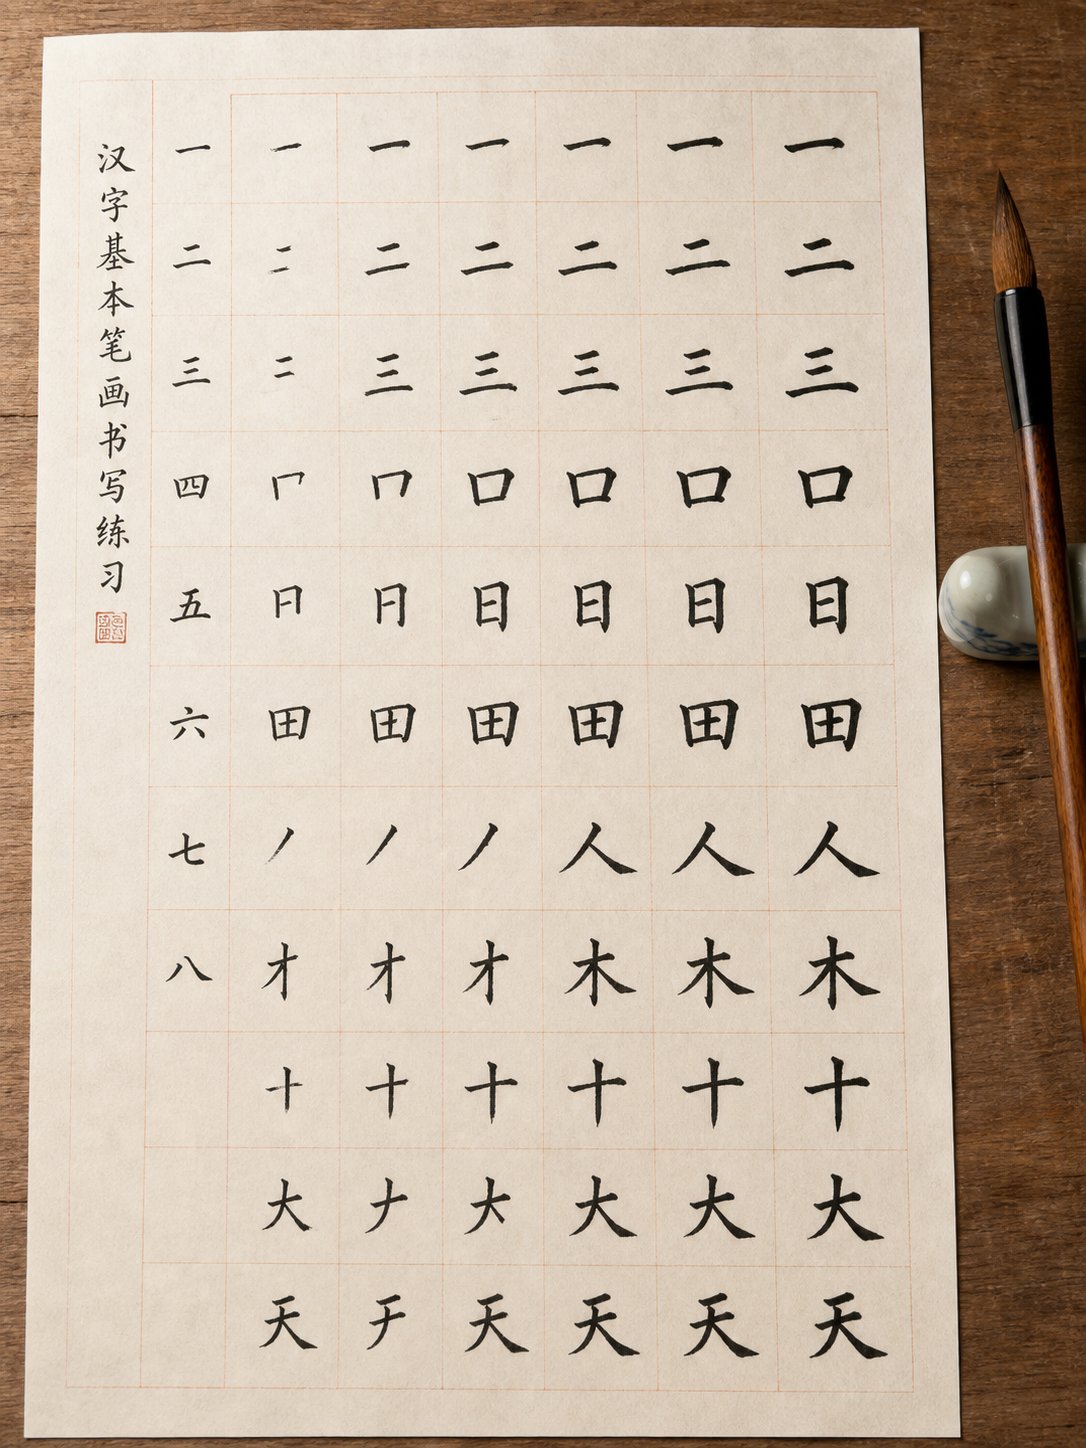
The easiest characters to write are those composed of just one or two stroke types. The character 一 (yi, one) is literally a single horizontal stroke. 二 (er, two) stacks two horizontals. 十 (shi, ten) crosses one horizontal with one vertical. These are beginner easy chinese symbols that let you focus on spacing and proportion without juggling multiple techniques at once.
As you add more stroke types, characters become more expressive. 人 (ren, person) uses only pie and na, the two falling strokes, leaning against each other like a tent. 大 (da, big) adds a horizontal across the top of that same structure. The chinese character big is a perfect early target because it forces you to balance three different strokes, heng, pie, and na, within a single frame. If your proportions are off, you will see it immediately.
This is how to write chinese words at the most fundamental level: recognize which strokes a character contains, recall the technique for each one, apply the correct stroke order, and pay attention to how the strokes relate to each other spatially.
How Radicals Are Built from Stroke Combinations
Radicals are recurring structural components that appear inside thousands of characters. They function like prefixes or roots in English, carrying meaning or indicating pronunciation. Every radical is itself built from basic strokes. The radical 木 (mu, wood) combines heng, shu, pie, and na. The radical 氵(three-dot water) is simply three dian strokes arranged vertically. Once you can execute the eight fundamental strokes, you can write any radical, and once you recognize radicals, complex characters stop looking like impenetrable chinese character drawing puzzles.
The progression works like this: strokes give you the physical vocabulary, radicals give you reusable building blocks, and compound characters are just radicals placed side by side or stacked top to bottom. A character like 休 (xiu, rest) is simply the person radical 亻on the left and the wood radical 木 on the right. Two familiar pieces, one new character. That pattern repeats across the entire writing system.
Your First Practice Characters
Here is a sequence of ten characters ordered by complexity. Each one is labeled with the strokes it uses, giving you a clear path for writing mandarin characters progressively:
- 一 (yi, one) — heng only. Pure horizontal stroke practice.
- 二 (er, two) — heng only. Focuses on even spacing between two parallel strokes.
- 十 (shi, ten) — heng + shu. Practice crossing strokes with correct proportion.
- 人 (ren, person) — pie + na. Two falling strokes meeting at a peak.
- 大 (da, big) — heng + pie + na. Balancing three strokes symmetrically.
- 木 (mu, wood) — heng + shu + pie + na. A vertical axis with branching strokes.
- 小 (xiao, small) — shu-gou + dian. Introduces the hook and dot together.
- 水 (shui, water) — shu-gou + heng + pie + na + dian. Five strokes radiating from a central vertical.
- 永 (yong, eternity) — all eight strokes. The complete training character.
- 林 (lin, forest) — two 木 radicals side by side. Your first compound character using repeated components.
Work through this list in order. Spend several practice sessions on each character before moving to the next. You are not just learning chinese basic characters here. You are training your eye to see how strokes interact, how spacing creates balance, and how the same stroke looks slightly different depending on its position within a character. That spatial awareness is what transforms stroke knowledge into actual writing ability.
By the time you reach 林, you are already doing what experienced calligraphers do: assembling familiar components into new combinations. The strokes have not changed. Your understanding of how they fit together has. That understanding also prepares you to appreciate how these same strokes take on dramatically different visual personalities depending on which script style you choose to write in.
Understanding Chinese Calligraphy Writing Styles and Where to Begin
The eight strokes you have been practicing are universal, but they do not look the same everywhere. A horizontal stroke written in one chinese writing style can appear completely different from the same stroke written in another. The brush movements are related, yet the visual results range from geometric precision to wild, abbreviated gestures. This variety is what gives chinese traditional calligraphy its extraordinary depth, and it is also what makes choosing a starting point so important.
Chinese calligraphy has five major script styles, each developed during a different historical period and each treating basic strokes with its own set of rules. Understanding these chinese calligraphy styles helps you see where your current practice fits within a larger tradition and where it can eventually lead.
Why Regular Script Is the Best Starting Point
The five styles, in rough chronological order, are:
- Seal script (篆书, zhuan shu) — The oldest surviving style, used on bronze vessels and official seals. Strokes are uniform in width with rounded, symmetrical forms. Individual stroke types are hard to distinguish because everything flows at the same thickness.
- Clerical script (隶书, li shu) — Developed during the Han Dynasty as a faster alternative to seal script. Strokes become flatter and wider, with distinctive wave-like horizontal strokes that flare at the ends. This is where distinct stroke identities begin to emerge.
- Regular script (楷书, kai shu) — Matured during the late Han and flourished in the Tang Dynasty. Each stroke is clearly separated, fully formed, and executed with the complete three-phase structure (qi bi, xing bi, shou bi). This is the chinese writing script used in modern printed text and formal handwriting.
- Running script (行书, xing shu) — A semi-cursive style where strokes begin connecting to each other. Some strokes are abbreviated, but the character remains legible. Speed increases while structure loosens.
- Cursive script (草书, cao shu) — The most expressive and abstract style. Strokes merge, simplify, and sometimes disappear entirely. Characters become fluid gestures that prioritize rhythm and energy over individual stroke clarity.
Regular script is the ideal starting point for one straightforward reason: it is the only style where every stroke exists in its complete, unabbreviated form. When you practice mandarin calligraphy in kai shu, you see exactly where each stroke begins, travels, and ends. Nothing is hidden, merged, or skipped. That transparency makes it possible to diagnose errors, build muscle memory for correct technique, and develop the spatial awareness needed for balanced characters.
Jumping straight to running or cursive script is like trying to write shorthand before learning to print. The abbreviations only make sense when you know what is being abbreviated.
How Strokes Transform Across Script Styles
Imagine writing the same horizontal stroke (横) in three different styles. In regular script, you execute the full entry-body-exit sequence: reverse left, travel right with even pressure, reverse and lift. The result is a self-contained line with defined endpoints. In running script, the entry shortens or disappears, the body moves faster, and the exit often trails into a connecting thread leading to the next stroke. In cursive script, the horizontal might reduce to a quick rightward flick or merge entirely into the stroke that follows it.
The same transformation applies to every stroke. Here is how three fundamental strokes compare across the three most commonly practiced chinese character styles:
| Stroke | Regular Script (楷书) | Running Script (行书) | Cursive Script (草书) |
|---|---|---|---|
| 横 Heng (Horizontal) | Full three-phase execution with clear start and end points; even width throughout the body | Entry simplified; stroke may tilt slightly; exit often connects to the next stroke via a thin trailing line | Reduced to a quick dash or absorbed into a continuous flowing movement; endpoints disappear |
| 竖 Shu (Vertical) | Straight downward with consistent pressure; rounded or pointed ending clearly visible | May curve slightly; speed increases; ending sometimes hooks into the next stroke's entry | Often shortened or curved dramatically; may merge with adjacent strokes into a single gesture |
| 点 Dian (Dot) | Compact, deliberate press with visible internal structure; teardrop or wedge shape | Quicker execution; shape loosens; may trail a connecting thread downward | Reduced to a flick or implied by the movement between other strokes; sometimes omitted entirely |
Notice the progression: regular script gives each stroke its full identity, running script begins trading completeness for flow, and cursive script prioritizes the energy of the whole character over the clarity of individual parts. Calligraphy chinese characters written in cursive can look like abstract art to untrained eyes, but a calligrapher trained in regular script can trace the underlying stroke logic beneath the fluid surface.
This historical evolution from clerical to regular script during the Han and Tang dynasties was itself a move toward clarity. Clerical script introduced distinct stroke shapes but kept them relatively flat and uniform. Regular script refined those shapes further, giving each stroke type a unique visual signature with precise pressure and directional rules. The chinese calligraphy writing styles you see today are the result of centuries of calligraphers balancing efficiency with expressiveness.
For your practice right now, regular script is home base. Master the eight strokes here, where every movement is visible and accountable. Once your kai shu characters are consistent and balanced, running script becomes a natural next step because you will understand exactly which parts of each stroke you are choosing to abbreviate. The freedom of expressive styles is built on the discipline of structured ones, and that discipline lives in the clear, deliberate strokes of regular script.
Common Mistakes and How to Fix Them
Your strokes will not look like the examples on your first attempt. Or your tenth. That is completely normal. What matters is whether you can identify why a stroke looks off and apply a targeted correction rather than repeating the same error hoping it resolves itself. Every visual problem in writing chinese calligraphy traces back to a specific technical cause, and most of those causes live within one of the three phases you already know.
The troubleshooting guide below is organized by what you see on the paper, because that is where diagnosis starts. Match your symptom to its likely cause, apply the fix, and you will describe chinese calligraphy writing progress in weeks rather than months.
Fixing Wobbly Lines and Uneven Thickness
Wobbly strokes and inconsistent line width are the two most common complaints beginners have. Both feel frustrating because you can see the problem clearly but cannot pinpoint what your hand is doing wrong. The root cause is almost always in the xing bi (行笔) phase, where the brush travels through the stroke body.
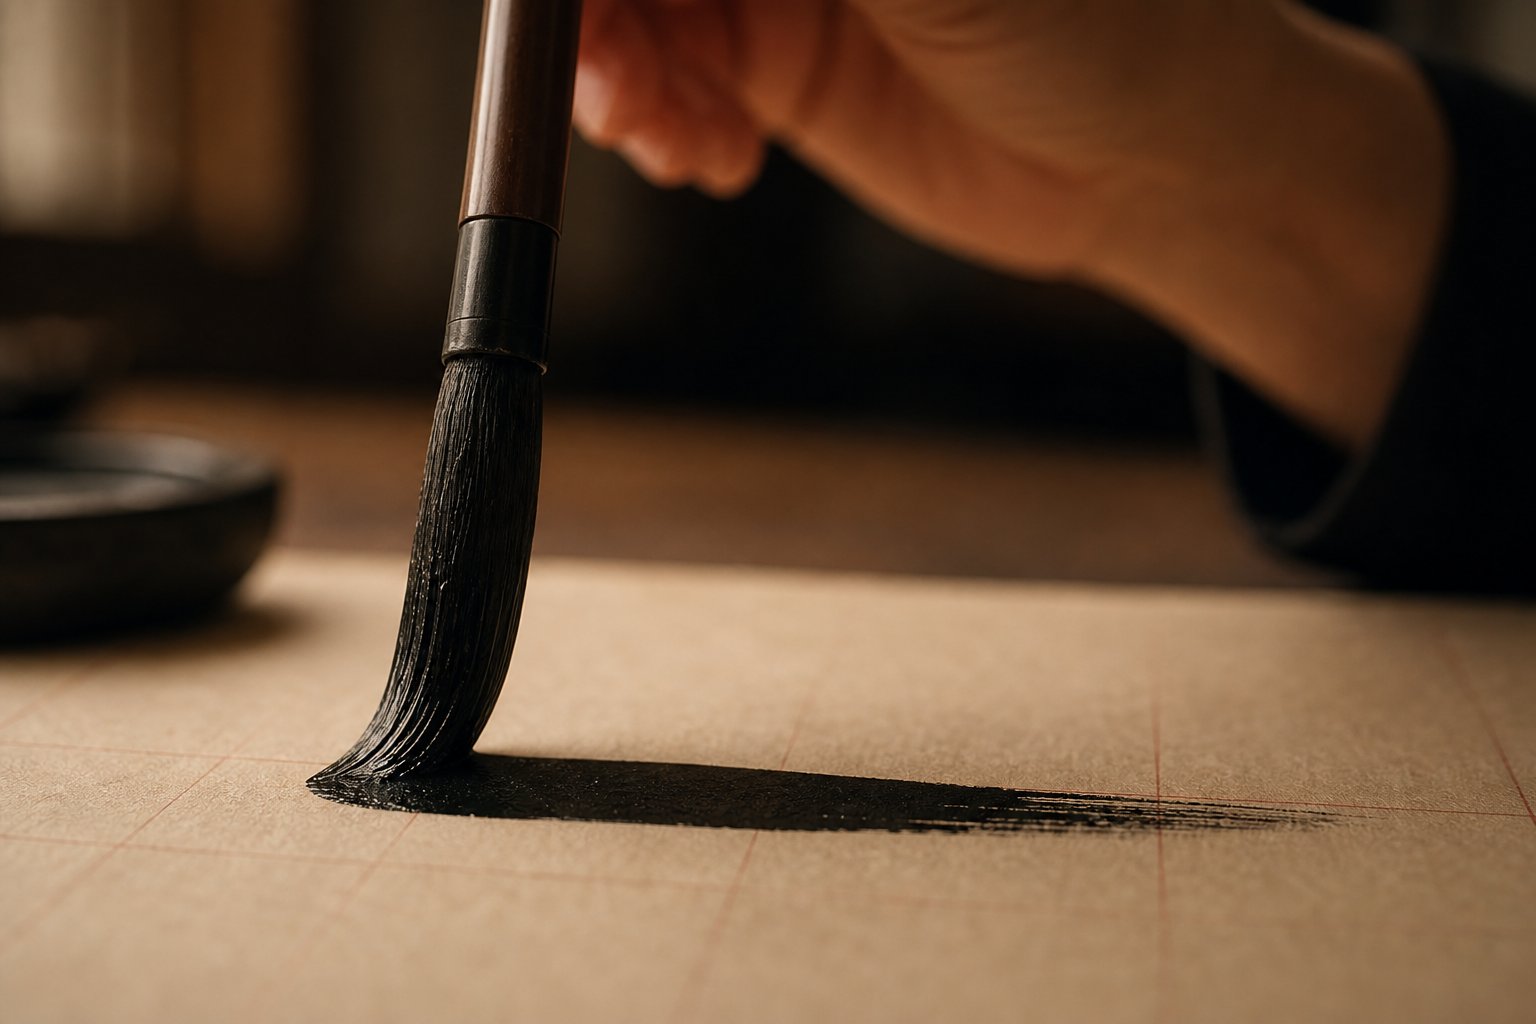
Wobbly lines happen when your wrist or fingers make micro-adjustments during the stroke instead of letting your arm carry the movement. Your hand is essentially fighting itself, trying to steer and stabilize simultaneously. The fix is counterintuitive: slow down. Move the brush at half the speed you think is correct. A slower pace gives your arm time to maintain a steady path without the jittery corrections that produce visible wobble.
Inconsistent thickness, where a stroke randomly thickens or thins, points to uncontrolled pressure variation. During xing bi, your job is to maintain even, deliberate pressure unless you are intentionally modulating it for strokes like pie or na. If thickness fluctuates on a horizontal or vertical stroke, check whether your suspended wrist is drifting downward mid-stroke. A sagging wrist adds pressure without your awareness. Re-engage your forearm muscles and keep the wrist elevation steady throughout.
Solving Ink Bleed and Paper Problems
Sometimes the issue is not your technique at all. Ink that spreads into fuzzy edges or bleeds through the paper is a materials problem masquerading as a skill problem. If your lines look soft and feathered no matter how carefully you write, check two things: ink consistency and paper absorbency.
Ink that is too watery spreads the moment it contacts the paper. Add less water when diluting, or switch to a thicker bottled ink. If you are grinding your own ink stick, spend more time grinding to increase pigment density. The ink should flow smoothly off the brush without running or dripping.
Paper absorbency is the other variable. Highly absorbent xuan paper pulls ink outward from the stroke edges, making precise lines impossible for beginners. Switch to practice paper with moderate absorbency (maobian paper or yuan shu zhi) until your speed and pressure control are consistent enough to handle more demanding surfaces. As one calligraphy teaching resource notes, wrong paper choice can make technically sound work look rough and amateurish, and the fix is simply matching your paper to your current skill level.
Here is a quick-reference table connecting common symptoms to their causes and solutions:
| Symptom | Likely Cause | Technique Fix |
|---|---|---|
| Wobbly, shaky lines | Finger-driven movement or excessive speed | Slow down the xing bi phase; let your arm drive the stroke; stabilize your suspended wrist |
| Ink bleeds and feathers at edges | Ink too watery or paper too absorbent | Thicken ink consistency; switch to less absorbent practice paper |
| Inconsistent stroke thickness | Uncontrolled pressure variation during xing bi | Maintain even wrist height; practice pressure drills on horizontal strokes |
| Blunt, abrupt stroke endings | Missing or rushed shou bi (收笔) phase | Pause at the end, reverse the tip back into the stroke body, then lift |
| Strokes look lifeless or flat | Hesitant, overly cautious qi bi (起笔) entry | Commit to the entry with confidence and slightly more speed; decisiveness creates energy |
| Blobby, oversized starting points | Too much pressure at qi bi | Lighten initial contact; the reverse-entry should be subtle, not a full press |
| Hook (gou) looks rounded instead of sharp | Gradual direction change instead of a crisp pause-and-flick | Fully stop at the hook point, compress the brush, then flick sharply |
Building Consistency Through Deliberate Practice
Knowing how to write in chinese calligraphy is one thing. Building the muscle memory to do it consistently is another. The gap between understanding and execution closes only through repetition, but not mindless repetition. Each stroke you practice should have a specific focus: am I nailing the qi bi entry today? Is my pressure even through xing bi? Does my shou bi feel controlled?
A realistic practice schedule for beginners looks like this: 15 to 30 minutes daily, focused on one stroke type per session. Monday might be all heng strokes. Tuesday, all shu. By the end of the week, you have given focused attention to several strokes without burning out. Short, consistent sessions build skill faster than occasional marathon practices because your muscles retain patterns better through daily reinforcement.
Expect visible improvement in individual stroke quality within two to four weeks of daily practice. Consistent character writing, where strokes look balanced and proportional within a full character, typically takes two to three months. These timelines assume you are practicing with attention rather than just filling pages. Ten strokes written with full awareness of all three phases teach more than a hundred strokes dashed off while watching television.
If you find the same mistake persisting after two weeks of targeted correction, the issue may be upstream. Wobbly strokes that do not improve with slower speed might actually be a grip problem. Inconsistent endings that resist shou bi practice might stem from arm fatigue caused by poor posture. When a fix does not work, look one level deeper in the chain: posture affects arm position, arm position affects wrist stability, wrist stability affects brush control, and brush control determines stroke quality.
There is one more thing worth embracing as you learn how to write chinese with a brush: the repetitive nature of simple calligraphy practice is not a limitation. It is the tradition itself. For centuries, calligraphers have treated stroke repetition as a form of meditation, a way to quiet the mind and sharpen focus through physical rhythm. The goal is not to rush through drills to reach calligraphy chinese words and full compositions. The goal is to find satisfaction in the process of refining a single stroke until it carries the energy, balance, and intention that make chinese calligraphy practice genuinely rewarding.
Frequently Asked Questions About Basic Chinese Calligraphy Strokes
1. How many basic strokes are there in Chinese calligraphy?
There are eight fundamental strokes in Chinese calligraphy: heng (horizontal), shu (vertical), pie (left-falling), na (right-falling), dian (dot), ti (upward flick), zhe (turning), and gou (hook). These eight movements combine in various arrangements to form every Chinese character in existence. The character 永 (yong, meaning eternity) is traditionally used as a training tool because it contains all eight strokes within a single form.
2. What is the best script style for beginners learning Chinese calligraphy?
Regular script (楷书, kai shu) is the recommended starting point for beginners. Unlike running or cursive scripts that abbreviate and merge strokes, regular script presents every stroke in its complete, unabbreviated form with clear entry, body, and exit phases. This transparency allows learners to see exactly what each stroke should look like, diagnose errors accurately, and build proper muscle memory before progressing to more expressive styles.
3. Why does stroke order matter in Chinese calligraphy?
Correct stroke order affects three practical outcomes: character balance, writing speed, and energy flow. Writing strokes in the proper sequence provides natural reference points for spacing and proportion. It also minimizes unnecessary hand travel, making your brush path more efficient. Most importantly for calligraphy, each stroke's ending position sets up the next stroke's starting position, creating smooth transitions and internal momentum that make characters look cohesive rather than disjointed.
4. What brush should a beginner use for Chinese calligraphy?
A medium-stiffness mixed-hair brush with a tip length of roughly 3 to 4 centimeters is ideal for beginners. Mixed-hair brushes blend soft goat hair with stiffer weasel hair, offering enough spring to control stroke direction while holding adequate ink for smooth lines. When dipped in water and pressed against your palm, the tip should come to a neat point, indicating the responsiveness needed for pressure variation across all eight basic strokes.
5. How long does it take to learn basic Chinese calligraphy strokes?
With daily practice sessions of 15 to 30 minutes focused on one stroke type at a time, most beginners see visible improvement in individual stroke quality within two to four weeks. Achieving consistent character writing where strokes look balanced and proportional within full characters typically takes two to three months. The key is deliberate practice with attention to the three phases of each stroke rather than mindless repetition filling pages without focus.